Pro Tools First users can quickly apply batch fades by selecting one or more clips and using the Batch Fade dialog box. With this tool, users can easily create fades in and out, crossfades, and adjusting fade curves with precision.
Pro Tools First, a digital audio workstation, comes with a range of features and tools for recording, editing, and mixing audio tracks. One of its powerful features is the Batch Fade tool, which allows users to apply fades to multiple audio clips at once.
This feature can save time and simplify the editing process, especially when working with large sessions. With the Batch Fade dialog box, users can adjust the length and shape of fades, apply crossfades, and modify the fade curves. The Batch Fade tool is a useful feature for any audio engineer or music producer looking to produce high-quality audio tracks efficiently.
Credit: www.soundonsound.com
How To Access Batch Fade In Pro Tools First
To access batch fade in Pro Tools First, navigate to the Edit menu and select Batch Fade. From there, you can adjust the settings to apply fades to multiple clips at once, saving you time and effort in your editing process.
How to Access Batch Fade in Pro Tools First Batch fade is an easy-to-use feature in Pro Tools First that allows users to batch fade multiple clips in a track, making the editing process much more efficient. To access Batch Fade in Pro Tools First, follow the steps below.
Accessing The Batch Fade Window
The Batch Fade window can be accessed in two ways – either through the Edit Window or the Mix Window. In the Edit Window:
- Select the clips you want to batch fade by holding down the “Shift” key and clicking on each clip.
- Right-click on any of the selected clips to open the context menu.
- Select “Batch Fade” from the context menu, and the Batch Fade window will appear.
In the Mix Window:
- Click on the desired track that you want to apply a Batch Fade to.
- Click the downward arrow located at the bottom of the track to access the drop-down menu.
- Select “Batch Fade” from the menu, and the Batch Fade window will appear.
Setting Up The Batch Fade Window
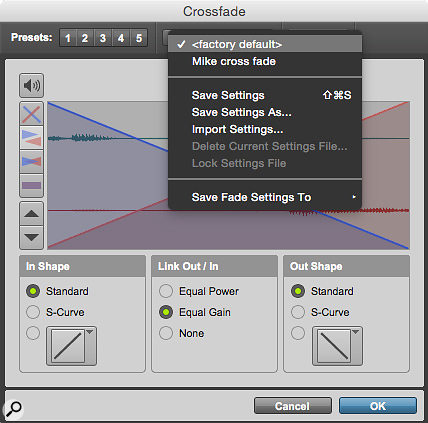
Once the Batch Fade window appears, you can set up the fade settings according to your needs. In the Batch Fade window, you can set:
- The Fade Shape (equal power, S-curve, or linear fade)
- The Fade Type (in, out, or both)
- The length of the fade
Fading With Pro Tools First Batch Fade
Using the Pro Tools First Batch Fade feature is simple once you have accessed and set up the settings in the Batch Fade window. To apply a batch fade, follow these steps:
- Ensure the Batch Fade window is open and set up correctly.
- Select the clips you want to fade.
- Click the “Apply” button in the Batch Fade window.
And just like that, your selected clips will be batch faded according to your chosen settings. Pro Tools First Batch Fade is an incredibly handy tool for any editor looking to speed up the editing process with ease. Accessing, setting up, and using the Batch Fade window is simple and efficient, making it an essential tool for any Pro Tools user.

Credit: www.soundonsound.com
Different Types Of Fades Available
Pro Tools First Batch Fade provides different types of fades to choose from, such as constant gain and constant power fades. These options allow for smooth transitions between audio clips and enhance the overall audio quality.
Different Types of Fades Available: Pro Tools First Batch Fade is an easy-to-use feature that allows you to quickly apply complex fades to multiple audio files. This feature is particularly useful when working on large audio projects with hundreds of audio clips and tracks. Batch fades can save time and increase workflow efficiency, enabling you to meet project deadlines without compromising on quality. There are different types of fades available in Pro Tools First Batch Fade, which can help to achieve the perfect balance between two audio clips when blending them together. Equal Power: Equal Power fades are commonly used when you want to fade in/out music tracks without any significant changes in volume. This type of fade equally reduces the amplitude of the audio signal at the start/end of a clip. Equal power fades produce a smooth and consistent transition from one clip to another. Equal Gain: Equal Gain fades are ideal for radio and TV broadcasting, where cutting to the next clip can disrupt the listener/viewer experience. This fade maintains a consistent level of gain between two clips, creating a seamless transition without any sudden fluctuations. S-Curve: S-Curve fades create a curved path that gradually fades the audio signals at the start/end of a clip. This type of fade is excellent for creating a natural, organic-sounding audio transition. S-curve fades can also reduce the effects of clicks and pops that may occur in audio transitions. Shape One: Shape One fades start suddenly and then gradually fade away. This type of fade is ideal for applying to drum tracks, where a quick start is essential. Shape One fades create a sharp sound, followed by a smooth fade. Shape Two: Shape Two fades gradually increase the volume of audio at start and then gradually fade away. This type of fade is perfect for creating an atmospheric sound effect, such as waves crashing onto a beach or a thunderstorm. Shape Three: Shape Three fades start with a sharp volume increase, then gradually decreases to a complete silence. This type of fade is excellent for creating a dramatic effect, such as an explosion or gunshot. By utilizing these different fade options, you can take your audio projects to the next level. Pro Tools First Batch Fade is an excellent tool for creating high-quality and professional-sounding audio mixes.
Advantages Of Using Pro Tools First Batch Fade
If you are a music producer, you understand how crucial batch fades are in your workflow. It is a time-consuming process that is critical in achieving a polished and professional sound. Fortunately, with Pro Tools First Batch Fade, you can effortlessly create batch fades to eliminate clicks, pops, and other unwanted noise from your audio recordings. Batch fades allow you to apply the same fade curve to multiple clips, which saves you time and effort. Here are some of the advantages of using Pro Tools First Batch Fade:
Time-saving
Pro Tools First Batch Fade is an incredibly efficient tool that is designed to save you time. Batch fades enable you to apply the same fade curve to multiple clips with just a few clicks. This feature saves you from the hassle of manually creating fade-ins and fade-outs, which can be a time-consuming process. Pro Tools First Batch Fade ensures that you spend less time working on fades and more time creating great music.
Precision And Consistency
When it comes to audio editing, precision and consistency are essential. Pro Tools First Batch Fade makes it easy to achieve both. With this tool, you can apply the same fade curve to multiple clips, ensuring that they all match in terms of volume and timing. Additionally, Pro Tools First Batch Fade allows you to control the length, shape, and depth of your fades, providing precision and consistency throughout your project.
Ease Of Use
Pro Tools First Batch Fade is incredibly easy to use. The tool is accessible from the Edit window, and the process of creating fades is straightforward. Additionally, the tool provides you with a visual representation of your fades, allowing you to preview them before applying them to your audio clips. This feature helps you to ensure that your fades are well-shaped and that they match the flow of your music.
In conclusion, Pro Tools First Batch Fade is an essential tool for any music producer. With its time-saving, precision, consistency, and ease-of-use features, the tool makes it easy to create professional-sounding audio recordings. If you want to take your music production to the next level, consider using Pro Tools First Batch Fade.
Tips And Tricks For Using Pro Tools First Batch Fade
Learn how to make the most out of Pro Tools First Batch Fade with these helpful tips and tricks. From selecting and editing fades to customizing your preferences, you’ll be a pro in no time!
Tips and Tricks for Using Pro Tools First Batch Fade Pro Tools First Batch Fade is a powerful tool that saves a lot of time while working on sound files. It allows users to apply a fade-in or fade-out effect to multiple clips at once, saving hours of manual work. In this post, we’ll explore some tips and tricks for using Pro Tools First Batch Fade effectively. Creating Custom Fade Shapes Pro Tools First Batch Fade has a number of preset fade shapes, such as Linear, Equal Power, and S-Curve. However, sometimes users may want to create custom fade shapes that suit their specific needs. Here’s how to do it: 1. Go to the Edit window and select the clip(s) you want to apply the fade to. 2. Click on the Batch Fade button in the toolbar. 3. In the Batch Fade window that opens up, select Custom Fade Shape from the Shape dropdown menu. 4. Drag the handles on the fade curve to create a fade shape that suits your needs. 5. Click Apply to apply the custom fade shape to the selected clips. Using Keyboard Shortcuts Keyboard shortcuts are a great way to speed up your workflow. Here are some useful shortcuts for using Pro Tools First Batch Fade: – Control + Option + F: Opens the Batch Fade window – Tab/Shift + Tab: Navigate between the fade-in and fade-out sections – Command + A: Select all clips in the session – Command + C: Copy the fade settings – Command + V: Paste the fade settings onto the selected clips Using Batch Fade with Multiple Clips If you want to apply the same fade settings to multiple clips, you can use Batch Fade with multiple clips at once. Here’s how to do it: 1. Select all the clips you want to apply the fade to. 2. Click on the Batch Fade button in the toolbar. 3. In the Batch Fade window that opens up, set the desired fade settings. 4. Click Apply to apply the settings to all the selected clips. This is a great time-saving feature for those working on long sound files that require consistent fades throughout. Conclusion: Pro Tools First Batch Fade is a must-have tool for sound editors who want to save time while working on extensive sound files. These tips and tricks can help users make the most out of the Batch Fade feature by creating custom fade shapes, using keyboard shortcuts, and applying the same fade settings to multiple clips. Using these tips, you can streamline your workflow and spend more time making your audio projects sound great!

Credit: www.mixinglessons.com
Frequently Asked Questions On Pro Tools First Batch Fade
How Do I Batch Fade In Pro Tools?
To batch fade audio in Pro Tools, select all the clips you want to affect and press Command+F. Then adjust the fade settings to your preference and hit apply.
How Do You Fade In Pro Tools First?
To fade in Pro Tools First, simply locate the track you wish to fade in, click on the volume line at the start of the audio clip, and draw a line upwards. This will slowly increase the volume over time, creating a fade in effect.
Alternatively, you can use the fade tool to automate the process.
What Is The Default Fade Length In Pro Tools?
The default fade length in Pro Tools is 5 milliseconds.
What Is The Shortcut For Fade All Clips In Pro Tools?
The shortcut for fading all clips in Pro Tools is Command+Option+F.
Conclusion
Creating a polished sound is an essential aspect of music production. With Pro Tools First Batch Fade, you can easily and efficiently create smooth transitions between tracks or fade-in and fade-out effects. This simple and powerful tool saves time and effort while enhancing the overall quality of your recordings.
By implementing Batch Fade into your workflow, you’ll be able to produce professional-sounding tracks in less time, ensuring your music stands out from the crowd. So why not give it a try and experience the benefits of this incredible tool for yourself?