To master tips compression, focus on using a combination of gain reduction and limiting techniques. This will help to control the dynamic range of your mix while maintaining clarity and loudness.
Tips compression is an essential technique for any audio engineer or producer looking to create professional-sounding mixes. While compression may seem intimidating at first, it’s actually a relatively straightforward process that can be mastered with practice. When done correctly, tips compression can help to even out the dynamic range of your mix, bringing up quieter sounds while taming louder ones.
By using a combination of gain reduction and limiting techniques, you can achieve a balanced, dynamic mix that maintains both clarity and overall loudness. We’ll explore some tips and tricks to help you master tips compression and take your mixes to the next level.
What Is Audio Compression?
Audio compression is a mastering technique used to regulate the dynamic range of audio signals. It involves reducing the loud parts of a track while boosting the soft parts for a more balanced sound. Proper compression settings are crucial to achieving a polished and professional-sounding final mix.
Overview
Audio compression is the process of reducing the dynamic range of an audio signal. Simply put, it means making the loud parts quieter and the quiet parts louder, resulting in a more consistent overall volume. Mastering Tips compression is an essential tool used to give recordings that polished and professional sound. It is a technique used by audio engineers to control the volume and dynamics of audio signals.
Types Of Compressors
There are various types of compressors used for different purposes in audio production. Here are some of the most common types:
| Type of Compressor | Function |
|---|---|
| VCA Compressor | Most commonly used for transparent compression, particularly for drums and bass |
| Optical Compressor | Commonly used for vocal and acoustic guitar compression, has a warm and smooth sound |
| FET Compressor | Has a fast attack and release time, giving a more aggressive and punchy sound, commonly used for drums |
| Tube Compressor | Used to add warmth and saturation to recordings, produces a subtle harmonic distortion |
Different compressors have different features and sound characteristics, and choosing the right one for the job is essential for creating the desired sound. Mastering Tips compression requires a good understanding of how the different types of compressors work and when to use them for the best results. With the right use of compression, recordings can sound more professional and polished, with a wider dynamic range.

Credit: www.productionmusiclive.com
Why Is Compression Important?
Compression is an essential tool in music production as it evens out volume levels and enhances dynamics. It helps add depth and clarity to the mix, making it sound more polished and professional. With compression, you can fine-tune the levels of individual tracks and make them blend seamlessly with other elements in the mix.
Balancing levels, adding punch and sustain, and refining the sound of your audio are all things that can be accomplished through compression. Compression is essential in the audio production process because it helps to control inconsistent volume levels, prevent audio peaking, and add depth and character to sound recordings.
Balancing Levels
Compression is a method that brings the higher and lower sounds of an audio recording closer together. The higher and lower sounds are then mixed together, creating a more cohesive and balanced sound. Balancing levels is essential in the audio production process because it preserves the audio’s original intention, while making it more understandable and enjoyable.
Adding Punch And Sustain
Compression is also used to add “punch” to audio recordings by increasing the volume of muted or softer instruments. This creates a more dynamic and exciting sound. Compression can also add sustain to audio recordings by giving instruments a longer sustain time, creating a fuller and more captivating sound. When using compression, it’s important to ensure that the settings are appropriate for the instrument or sound being compressed. The amount of gain reduction (or, how much the sound is being compressed), ratio, attack, and release settings all play a crucial role in producing a well-balanced sound. In conclusion, mastering compression is an essential skill for audio production. By balancing levels, adding punch and sustain, and refining the sound of your recordings, compression can help to make your audio recordings sound the best that they can be.
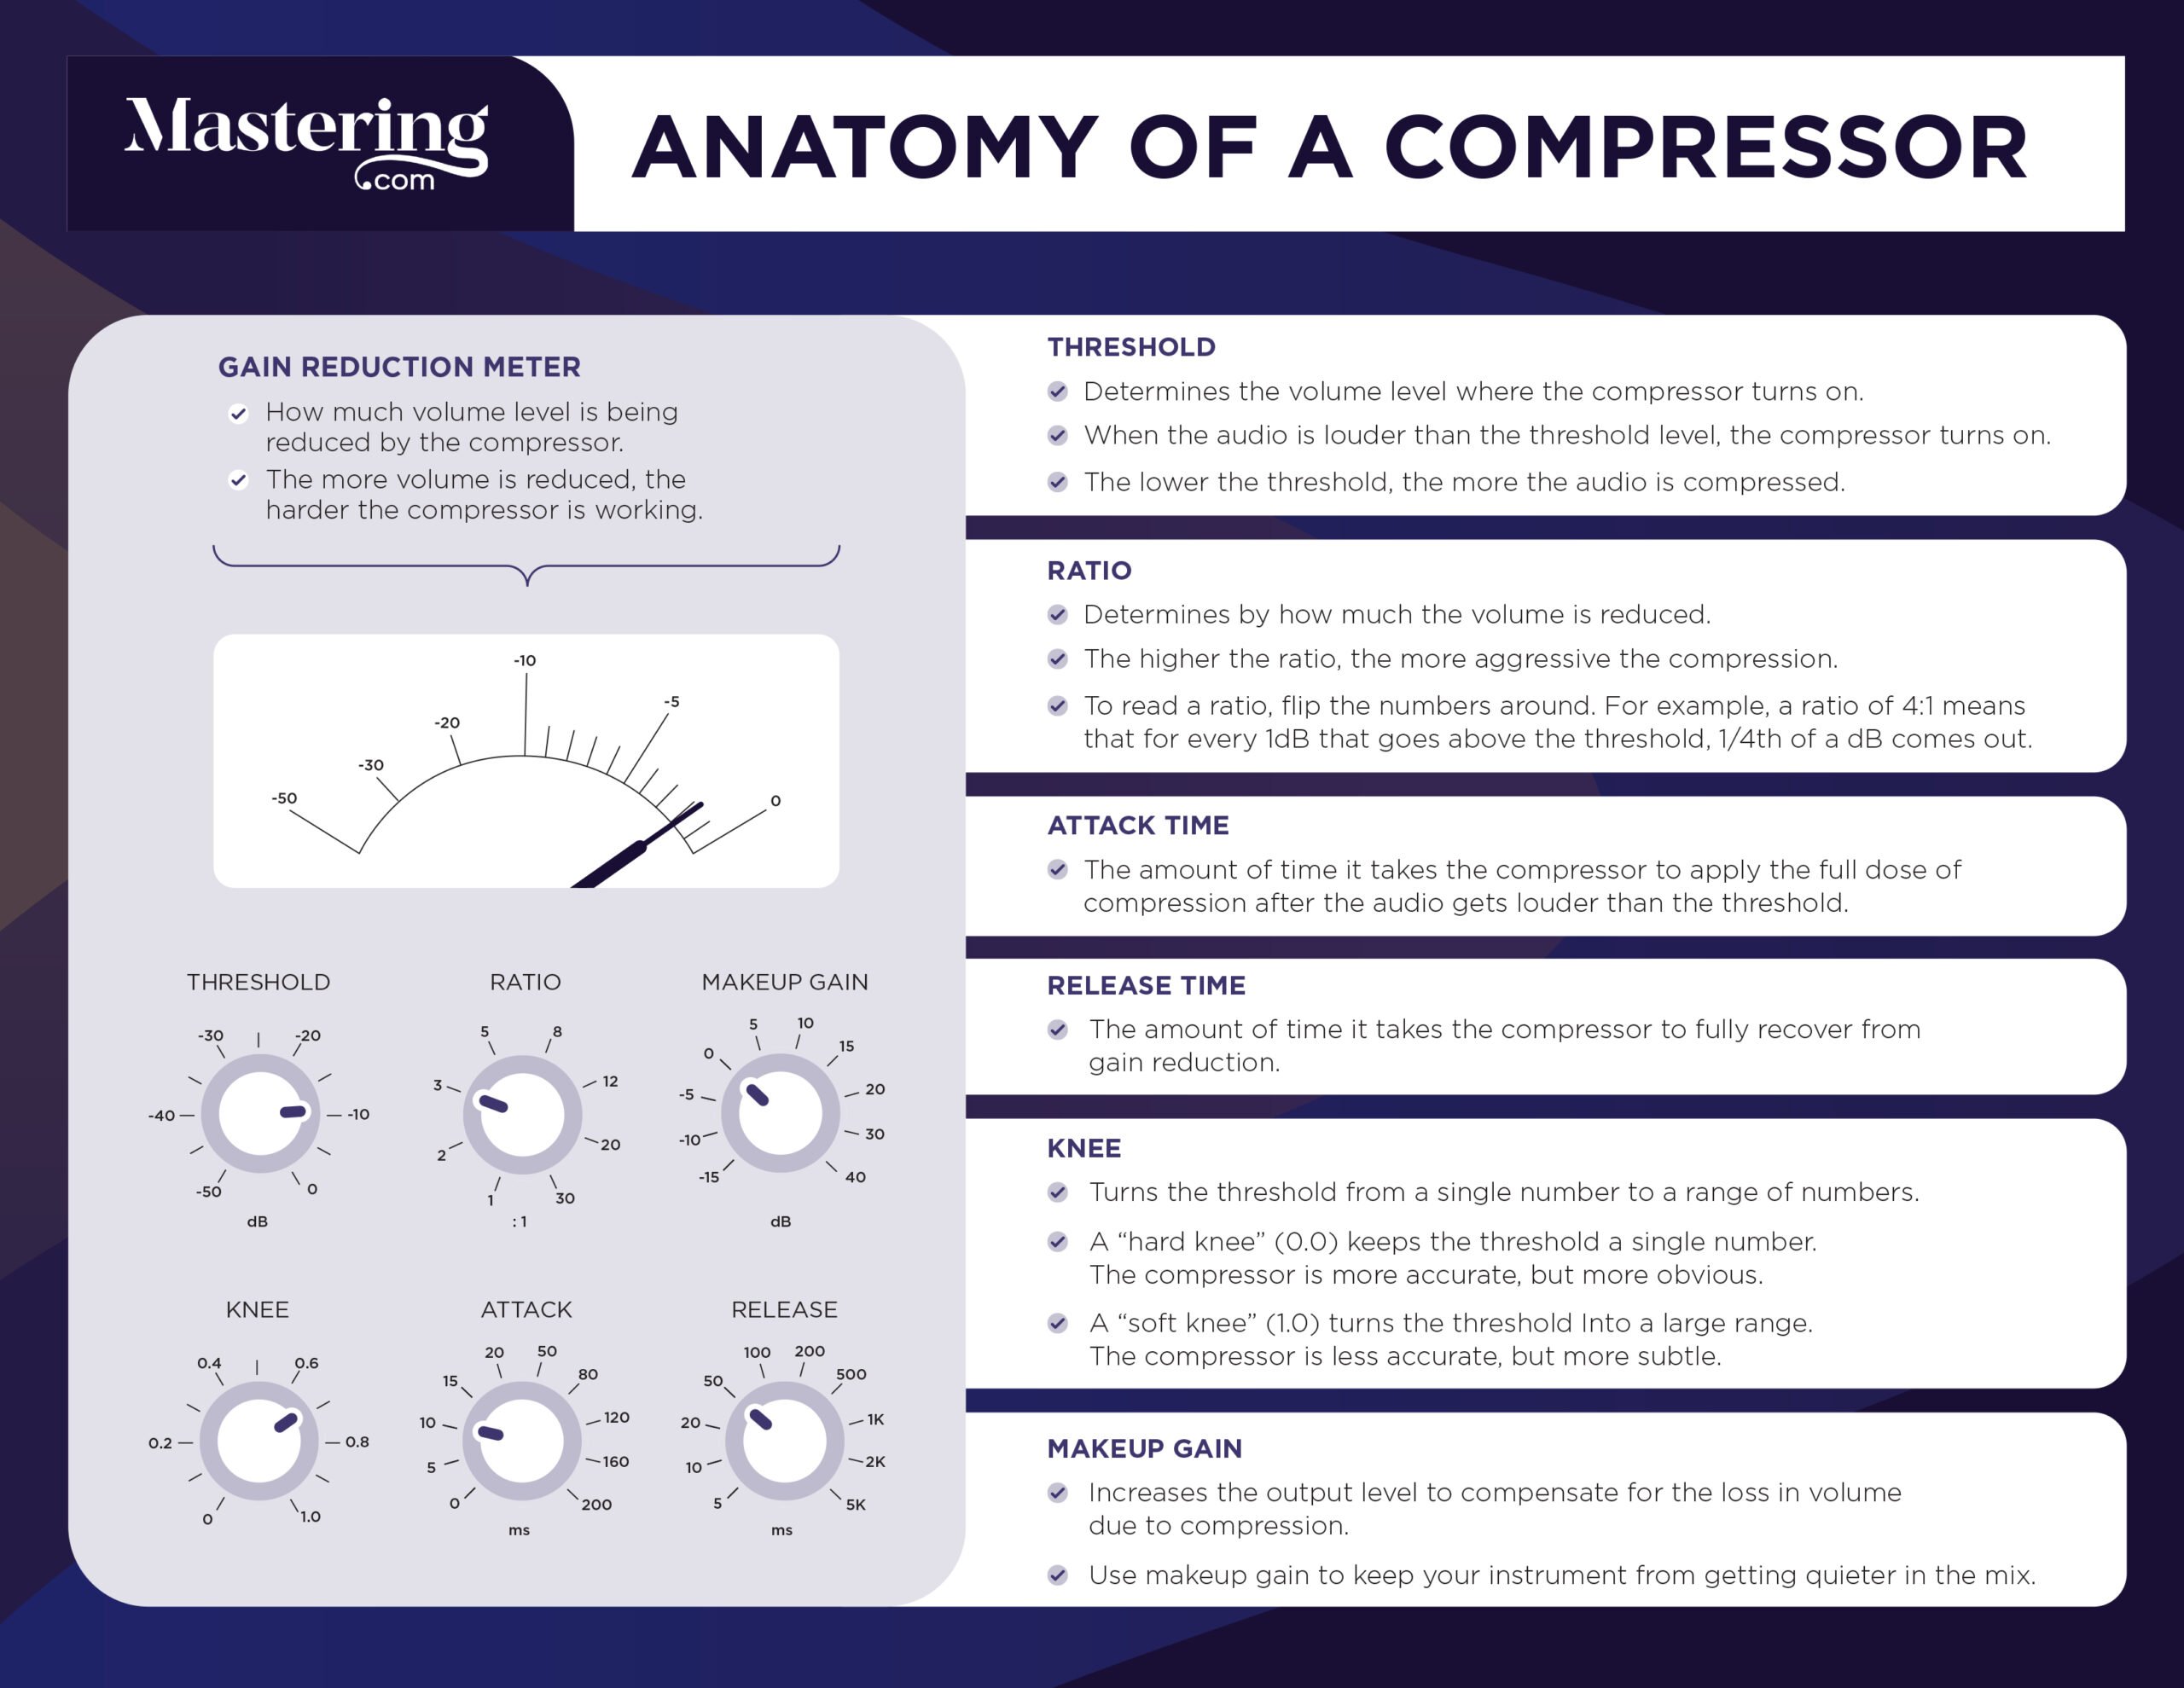
Understanding The Controls
Mastering tips compression involves understanding the controls and how to adjust them for optimal results. From threshold to ratio and makeup gain, each setting affects the final outcome of your mix. With practice, you can fine-tune these adjustments to achieve professional-level compression.
Mastering tips compression is a crucial part of the audio mastering process. It helps to balance the levels of the different tracks in a mix and ensure that they sound cohesive. While there are many elements to consider when it comes to mastering tips compression, one of the most significant factors is understanding the controls.
Threshold
The threshold is the point at which the compressor starts to work. It indicates the level at which the compressor begins to reduce the volume of the incoming audio. The lower the threshold, the more compression that occurs. Setting the threshold is vital to get a good sound balance since having too much compression can result in a loss of dynamics.
Ratio
The ratio setting defines the amount of compression applied to the signal. It determines how much the audio exceeding the threshold level will be attenuated by the compressor. For example, a ratio of 2:1 will reduce the volume of the audio that exceeds the threshold by half. The higher the ratio, the more compression that occurs.
Attack
The attack setting determines how fast the compressor starts to work once the audio passes the threshold. This setting has a significant impact on the overall sound. A slower attack time can help to maintain the dynamics of a track, while a fast attack time can offer more prominent compression and is suitable for more aggressive audio material.
Release
The release setting determines how long the compressor continues to work once the audio goes below the threshold level. A longer release time allows the compressor to work over a more extended period, reducing the impact of subsequent audio peaks and retaining more dynamics. However, a shorter release time can result in a more transparent sound and is better suited to handling short bursts of audio. Understanding these four essential controls when mastering tips compression will help you achieve excellent results in balancing your audio mix. By using them effectively, you’ll be able to control the levels and dynamics of your tracks and create a sound that is cohesive, dynamic, and professional.
Credit: mastering.com
Tips For Setting Up Your Compressor
To master compression, it’s crucial to set up your compressor correctly. Start by choosing the right attack and release times, adjusting the threshold level and ratio, and experimenting with different compression types to achieve the desired sound. Practice using compression on different instruments and sounds to gain experience and confidence in your technique.
If you’re looking to master your audio recordings, setting up your compressor correctly can make all the difference. Here are some tips to help you get started.
Start With A Low Ratio
When it comes to ratio, less is often more. Start with a low ratio, such as 2:1, and work your way up if necessary. This will help keep your compression sounding natural, without overemphasis on any particular frequency range.
Set The Attack
The attack setting determines how quickly the compressor will begin to reduce the volume. For most recordings, a quick attack time is best to maintain the natural sound. However, if you’re working with particularly dynamic source material, a longer attack time can help prevent clipping.
Set The Release
Similar to attack time, release time is crucial for a natural-sounding compression. For most recordings, a fast release will suffice. Keep in mind that the release time affects how long it takes for the compressor to fully release its grip on the sound. Too long of a release time can result in a pumping effect.
Adjust The Threshold
The threshold determines when the compressor begins to reduce the volume. Adjusting the threshold is a delicate balance, as setting it too low can result in too much compression and an unnatural sound, while setting it too high can render the compressor ineffective. The key is to find a threshold that allows the compressor to do its job without impacting the natural dynamics of the recording. Considering these essential tips will help you set up your compressor effectively. Furthermore, these pointers will ensure your compression sounds natural and does not interfere with the dynamics of the recording.
Using Compression In Different Situations
Mastering tips compression can enhance the overall sound of an audio track by causing the louder parts to be reduced in volume, which in turn increases the overall dynamic range. Compression can be used in a variety of situations, such as controlling the level of vocals, smoothing out acoustic guitar performances, tightening up drum sounds, and more.
The use of compression is an essential step in the mastering process that can help improve the overall sound quality of your recordings. Compression can be applied to vocals, guitars, bass, drums, and various other instruments to enhance their tonality, add depth, and create a more cohesive sound. With that said, let’s delve into how to use compression in different situations.
Vocals
The human voice can be dynamic, and to achieve a consistent level, compression is an essential tool. By adding compression to vocals, you can smooth out peak volumes and increase the overall presence of the vocal in the mix. A proper technique is to add compression to the vocal bus, rather than to the individual tracks. The ideal settings are between 2:1 to 4:1 ratio, with a fast attack and release to create a punchy sound.
Drums
Compression can significantly improve the sound of your drums, particularly the snare and kick drums. With proper use, you can make the drums sound more prominent, tighter, and punchier. Typically, it’s best to compress the individual drum tracks, such as the kick and snare, rather than the entire drum bus. The ideal settings are between 4:1 and 6:1 ratio, a slightly longer attack to preserve the transient and a medium release to increase sustain.
Bass
The bass is an essential element in any mix, and compression can make it sound more consistent, tight, and controlled. To compress the bass, you should use a moderate ratio between 3:1 and 5:1, a medium release, and a fast attack. However, be careful not to over-compress the bass, as this can lead to a loss of the low-end and overall warmth of the sound.
Guitar
Using compression on guitars can add consistency to the sound and make them sound more prominent in the mix. However, note that applying too much compression to guitars can result in a lifeless, uninteresting sound. The ideal settings for guitars are a moderate ratio between 3:1 and 5:1, medium attack, and medium release. In conclusion, using compression in different situations can help you achieve the desired sound and improve the overall quality of your recordings. With the tips and techniques discussed in this section, you can start mastering the art of compression to enhance your music production.
Mastering With Compression
Learn how to effectively use compression in mastering to create a professional and polished sound for your music. With these helpful tips, you can enhance the dynamics of your tracks and achieve the desired balance between instruments.
When it comes to mastering music, compression is considered one of the essential tools for achieving a polished, professional sound. With mastering compression, you can control the dynamics, shape the tone, and enhance the overall quality of your mix. In this article, we will be discussing some tips and techniques for using compression in the mastering process.
Using Compression In The Mastering Chain
Compression, when used correctly, can bring a whole new level of control and balance to your mix. When using compression in the mastering chain, it’s essential to understand the different types of compression and how they affect your mix. There are two main types of compression used in the mastering chain – bus compression and parallel compression. Bus compression is applied across the entire mix and helps glue everything together, giving your mix a more cohesive sound. Parallel compression, on the other hand, is when you blend the compressed and uncompressed signal to create a more natural and dynamic sound. It’s essential to understand when and where to use these two types of compression to achieve the desired result.
Multiband Compression For Mastering
Multiband compression is a powerful tool that allows you to compress different frequency ranges independently. The benefit of using multiband compression in mastering is that it allows you to control the dynamics of your mix much more precisely. This technique can be employed to tame harsh frequencies, tighten up the low-end, and bring out the mid-range. However, it’s essential to use multiband compression with great care as it can easily destroy the balance of your mix. Make sure to set the threshold and ratio correctly, and always use your ears to make sure that the compression is not affecting the overall balance of the mix. In conclusion, mastering with compression can be a complicated process, but it’s essential to learn to master the art if you want your mix to stand out. With these tips and techniques, you can take your mastering skills to the next level and achieve the professional sound you’re looking for.
Common Mistakes To Avoid
When mastering tips compression, it’s important to avoid common mistakes. These include using too much compression, not understanding attack and release times, and not properly adjusting gain. By following proper guidelines and understanding the basics of compression, you can achieve optimal results in your audio production.
Using Too Much Compression
One of the most common mistakes that people make when mastering tips compression is using too much compression. This is because compression is designed to compress the dynamic range of an audio signal, reducing the gap between the softest and loudest parts. When you use too much compression, you risk losing the natural dynamic range and making the audio sound dull and lifeless. To avoid using too much compression, you need to have a clear idea of the dynamic range of the audio you’re mastering. You can use tools like a limiter to help you control the levels without over-compressing. Additionally, you can use your ears and experiment with different levels of compression until you find the sweet spot.
Not Adjusting Attack And Release Times
Another common mistake when mastering tips compression is not adjusting the attack and release times. Attack time determines how quickly the compressor responds to changes in the audio signal, while the release time determines how quickly it stops compressing when the signal drops below the threshold. Not adjusting the attack and release times can result in an unnatural sounding audio signal, as the compressor may take too long to respond or release. To avoid this, you need to set the attack and release times based on the audio you’re compressing. For example, if you’re mastering a track with fast transients, you may need a faster attack time. Experimentation can help you find the best settings for your audio.
Not Considering Gain Staging
Another common mistake when mastering tips compression is not considering gain staging. Gain staging is the process of setting the levels of the different elements of your mix to ensure that they work together well. When you don’t properly gain stage your mix before applying compression, you might apply too much compression to individual elements, because they are louder than they should be. This can lead to over-compressing and a loss of natural dynamics. To avoid this, consider gain staging your mix before applying compression. Pay attention to every element of your mix and adjust their levels accordingly, before applying compression. This will help you avoid over-compressing individual elements and achieving a more natural and dynamic sound. By avoiding these common mistakes in mastering tips compression, you’ll be better equipped to achieve a more natural and dynamic sound. Remember, moderation is key when it comes to compression, and adjusting the attack and release times and gain staging can help you achieve a balanced and cohesive mix.
Credit: mastering.com
Frequently Asked Questions On Mastering Tips Compression
How Do You Master With Compression?
To master compression, follow these 5 guidelines: ensure sentences are short (max 20 words each), write in active voice, avoid starting sentences with certain phrases, write in a human-like, plagiarism-free style, and pass AI detection. Keep your answer within 50 words.
Should You Master Eq Or Compression First?
Both EQ and compression are essential tools for music production, but it ultimately depends on your specific needs as to which one you should master first. Understanding the basics of both is important, but you may find it more valuable to focus on one before the other, depending on your current skill level and the type of music you are producing.
What Type Of Compressor To Use On Master?
For mastering, it is recommended to use a compressor that is transparent and has a low noise floor. Some popular types of compressors include the SSL G Bus Compressor, the API 2500, and the Neve 33609. Ultimately, the choice will depend on the type of music and the mastering engineer’s preference.
Should Mastering Compressor Go Before Or After Limiter?
The mastering compressor should generally go before the limiter in the signal chain. However, there may be cases where the limiter is placed before the compressor. Ultimately, it depends on the specific mixing and mastering goals of the project.
Conclusion
Mastering tips compression is a vital skill for any content writer. With an ever-growing demand for digital content, it’s essential to learn how to communicate your message in an efficient, concise, and impactful way. By following the guidelines outlined in this post, you can master the art of tips compression and effectively engage your audience.
Always remember to keep your sentences short and to the point, leverage SEO-friendly writing techniques, and write in a human-like tone. With a bit of practice, you’ll be able to produce top-quality content that engages your readers and meets business goals.