To record bass at home, invest in a good audio interface and microphone. With these tools, you can capture the sound of your bass guitar and record it directly onto your computer.
If you are a bass player, you know the importance of recording your bass lines accurately, whether it’s for your own personal use or for a studio recording. But investing in a professional recording studio can be expensive. Fortunately, with some essential equipment and a little bit of know-how, you can record bass at home and achieve professional-quality recordings.
We will walk you through the steps needed to get started, including selecting the right audio interface and microphone, setting up your recording space, and capturing the best sound possible from your bass guitar. By the end of this article, you will be well-equipped to record your own bass tracks at home.
Understanding Bass Recording
Recording bass at home can seem like a daunting task, but with the right approach, it can be a great way to achieve a professional sound without breaking the bank. A few key tips for recording bass at home include investing in a high-quality DI box, finding the right mic placement, and experimenting with different amp settings.
Recording bass at home can be a challenging task, but with the right techniques and tools, you can achieve professional-sounding results. One of the most critical factors in recording bass is understanding the different types of bass guitars and how to use them effectively.
Types Of Bass Guitars
There are several types of bass guitars, each with its unique characteristics. The most common ones are:
- Electric Bass: This is the most popular type of bass guitar used in modern music production. It is versatile, produces a wide range of sounds, and can be easily amplified.
- Acoustic Bass: This type of bass guitar is larger than the electric bass and has a hollow body, which gives it a warmer and softer sound.
- Fretless Bass: Unlike the electric and acoustic bass, the fretless bass does not have frets. This allows the player to produce more fluid and expressive notes.
- Upright Bass: Also known as the double bass, the upright bass is the largest of all the bass guitars, and it produces a deep and rich sound commonly found in jazz or classical music.
Bass Recording Techniques
To capture the best sound possible when recording bass at home, consider using the following techniques:
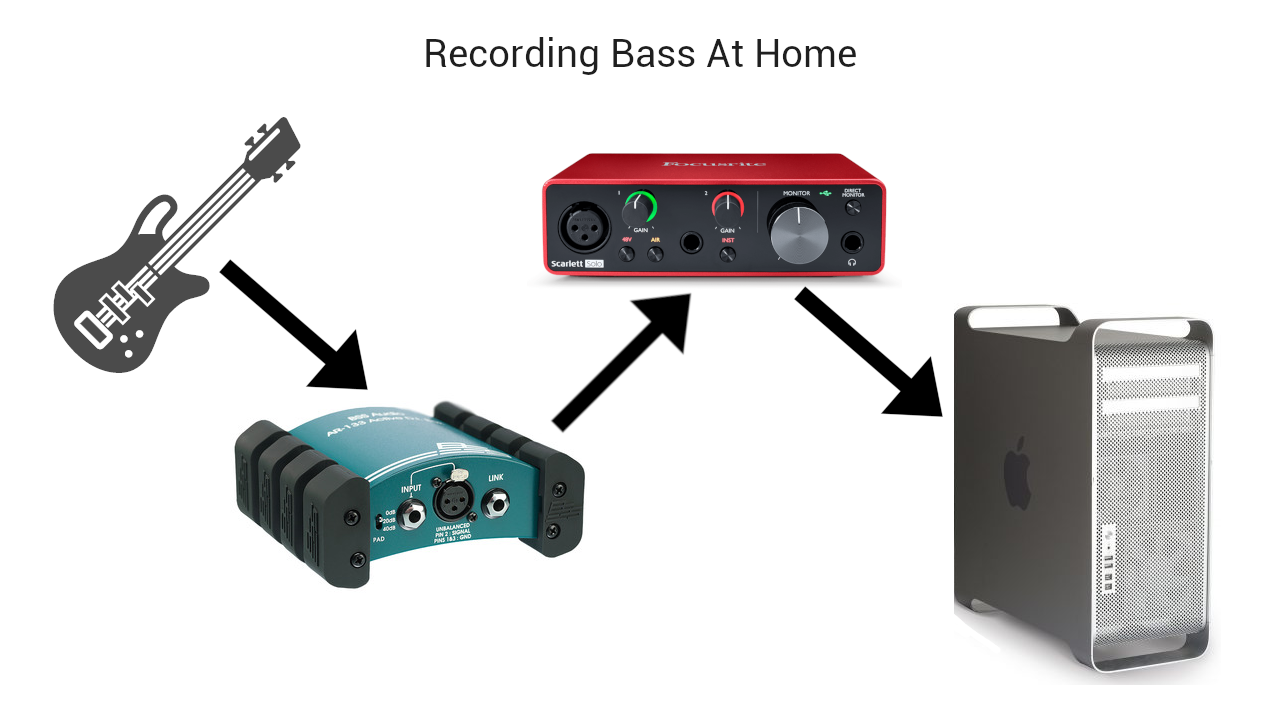
- Direct Input: This method involves plugging the bass guitar directly into an audio interface. This technique is best suited for electric bass and allows for more control during post-production.
- Mic Placement: This technique involves using a microphone to capture the sound of the bass guitar. The placement of the microphone is crucial in achieving the desired sound. The closer the mic is to the bass, the more low frequencies will be captured, while moving it farther away will result in a more balanced tone.
- Room Mic: This technique involves placing a microphone away from the bass guitar to capture the acoustic qualities of the room. This method is best suited for acoustic bass guitars and can add depth and warmth to the sound.
- Layering: This technique involves recording multiple tracks of the same bass guitar part and adding them together to create a fuller and thicker sound. This method is best suited for electric bass and can add character to the sound.
- Compression: This technique involves using a compressor to even out the dynamics of the bass guitar sound. Compression is best used during post-production to balance out the sound and to prevent it from getting lost in the mix.
In conclusion, understanding the different types of bass guitars and applying the right bass recording techniques can go a long way in recording bass at home. With practice and patience, you can achieve professional-sounding results without having to leave your house.
Setting Up Your Home Recording Studio
To record bass at home, setting up your recording studio should include a proper sound interface, microphone, and a recording software. Find a suitable room where sound quality is optimal to avoid any unwanted noise. Practice with different recording position and microphone placement to perfect your sound.
Choosing The Right Room
Selecting the perfect location to set up your home recording studio is critical. Avoid setting up your recording space in a noisy area or near a busy road. Choose a room that is available, spacious, and with minimal noise distractions. A basement, an extra room, or a garage could be an ideal location for your home recording studio. Ensure that the room is not exposed to high humidity levels and has proper ventilation.
Acoustics
Acoustics also plays a vital role in home recording studios. A poorly treated room can ruin a great recording, but luckily you can solve this problem by installing acoustic treatment. Acoustic treatment is a process of using sound-absorbing products such as foam panels, bass traps, and diffusers to reduce unwanted sound reflections that may occur in the room. If you want to create a great-sounding recording space, you should invest in acoustic treatment.
Equipment Needed
To record bass at home, you need to have the following equipment:
- A quality bass guitar
- A bass amplifier or a direct injection box (DI)
- An audio interface, mixer, or digital audio workstation (DAW) to capture the sound from your bass guitar
- Studio monitors or decent headphones for playback and mixing
- Microphone (optional) to capture the sound of your bass cabinet or amp if you choose to record with a microphone
In conclusion, by setting up your home recording studio, you give yourself the freedom to create and build your own sound without the need to rent a professional studio. With proper room selection, acoustic treatment, equipment, and expertise in recording techniques, you can achieve a quality bass sound that sounds just like in a professional studio. Good luck in your quest for the perfect recording space!
Preparing For The Recording Session
To prepare for a recording session when recording bass at home, ensure your equipment is set up properly, practice your parts thoroughly, and have a clear idea of what the final product should sound like. Test and adjust your tone beforehand and eliminate any potential background noise to get a clean recording.
Preparing for a recording session is vital to ensure that you produce a high-quality bass track. There are several things you can do before you start recording to make sure things go smoothly. In this article, we will discuss how to prepare for a recording session when recording bass at home, including tuning the bass guitar, preparing the DAW, and creating a click track.
Tuning The Bass Guitar
Tuning your bass guitar is an essential part of preparing for a recording session. You want your bass to be perfectly in tune to ensure that it sounds great in the mix. Before recording, use a tuner to check each string’s tuning and make any necessary adjustments. Take the time to play each string individually and identify any notes that sound off so you can quickly tune them.
Preparing The Daw
When you record bass at home, you need to have everything set up properly in your digital audio workstation (DAW). Before starting the recording session, open your DAW and create a new recording session. Make sure your audio interface is connected, and check your audio settings to ensure everything is set correctly. Set your recording level, and make sure your tracks are set up the way you want them to be.
Creating A Click Track
Creating a click track is essential to keep things in time and ensure that your bass playing is steady. A click track is a metronome-like sound that plays in your headphones while recording. It helps keep you on beat and ensures that your playing stays consistent. To create a click track, open a new track in your DAW and select the click track option. Adjust the tempo to match the song’s beat and adjust the volume to your preference. In conclusion, preparing for a recording session is a critical step before recording bass at home. By tuning your bass, preparing your DAW, and creating a click track, you can ensure that your recording session will go smoothly. Take the time to set everything up correctly, and you will get the best possible results from your bass recording.
Microphone Placement Techniques
To capture the best sound possible when recording bass at home, microphone placement is crucial. Experiment with different positions, such as close to the amplifier or in front of the speaker, to achieve the desired tone. The distance from the speaker can also affect the sound, so play around until you find the ideal placement for your setup.
Recording bass at home can be an exciting experience for every bass player. However, getting the right sound can be challenging. One of the essential elements that can determine the quality of your recording is microphone placement. It’s crucial to understand different microphone placement techniques to achieve the sound you desire. Here are some microphone placement techniques to consider:
Di Recording
DI recording is the easiest method of recording a bass guitar. The technique involves plugging the bass guitar into a DI box and recording it directly into your audio interface. DI recording is an excellent technique if you want a clean, reliable, and consistent sound. It’s essential to place the DI box between the bass and the amplifier.
Amplifier Recording
Amplifier recording involves recording the sound of your bass guitar through an amplifier and miking the amplifier with a microphone. This technique produces a more natural and warmer sound than DI recording. If you choose this technique, it’s essential to choose the right amplifier and microphone.
Mic Placement For Amplifier Recording
Mic placement is crucial in amplifier recording. Here are some points to consider:
- Position the microphone close to the speaker cone for a brighter and detailed sound.
- For a warmer and less detailed sound, position the microphone in front of the amplifier.
- For a more robust and less boomy sound, position the microphone on the side of the amplifier.
In conclusion, choosing the right microphone placement technique is essential to achieve the desired sound when recording bass at home. Whether you choose DI recording or amplifier recording, mic placement plays a significant role in the outcome of your recording.
Mixing Your Bass Tracks
Recording bass at home can be a cost-effective solution for musicians. Mixing your bass tracks is essential in producing a polished final product. With proper techniques and equipment, capturing a clean and consistent bass sound in a home studio is achievable.
Recording bass at home can be challenging, but mixing your bass tracks can be even more difficult. Whether you’re new to mixing or a seasoned pro, there are a few things to keep in mind when you’re working with bass tracks. In this section, we’ll go over some essential tips and techniques to take your bass tracks to the next level.
Balancing The Levels
One of the first things you’ll want to do when mixing your bass tracks is to balance the levels. That means making sure the bass isn’t too loud or too soft compared to the other instruments in the mix. You want the bass to complement the other instruments, not overpower them. To balance the levels, start by soloing the bass track and playing it back at the loudest part of the song. Then, gradually add in the other instruments one at a time, adjusting the level of the bass as you go. Keep tweaking until you find the right balance.
Eq And Compression Techniques
Next up, it’s time to work on the EQ and compression of your bass tracks. EQ is essential for shaping the tone of your bass, while compression can help even out the volume and add sustain. Start by using a high-pass filter to remove any unwanted low-end rumble from the bass. You can also boost the midrange frequencies to add some warmth and definition to the sound. Then, use a compressor to tame any peaks and add sustain.
Adding Effects
Finally, you can add some effects to your bass tracks to give them a little extra something. Consider adding some reverb or delay to create a sense of space and depth. You can also experiment with distortion, overdrive, or saturation plugins to add some grit and character to the sound. Remember, when adding effects, a little bit goes a long way. You don’t want to overwhelm the mix with too much processing on the bass. Keep it subtle and tasteful. In conclusion, mixing your bass tracks can be tricky, but it’s an essential part of creating a great mix. By balancing the levels, using EQ and compression techniques, and adding some effects, you can take your bass tracks to the next level and create a cohesive, professional sounding mix.
Credit: www.joecrowtheaudiopro.com
Editing Your Bass Tracks
Editing your bass tracks is an important process that can make a significant difference to the quality of your music. With the right editing techniques, you can transform raw bass tracks into polished, professional-sounding recordings. In this blog post, we’ll discuss some key editing techniques for bass tracks and explore how you can identify and fix mistakes, utilize punch-ins and outs, and edit for timing to create high-quality bass tracks.
Identifying And Fixing Mistakes
The first step in editing your bass tracks is to identify any mistakes that need to be corrected. When listening back to your recordings, be sure to pay attention to things like timing, pitch, and overall tone. If you notice any errors, take note of them and prepare to make corrections. With bass tracks, some common mistakes include buzzes and unwanted noise, incorrect notes, and inconsistencies in timing or tone. To fix these issues, you may need to use editing software like Audacity or GarageBand and apply techniques such as EQ, compression, and noise reduction.
Utilizing Punch-ins And Outs
Another useful editing technique for bass tracks is utilizing punch-ins and outs. This technique involves isolating a small section of your recording and re-recording that particular section to correct any mistakes. With punch-ins and outs, you can fix errors without having to re-record the entire track. To use this technique effectively, make sure to listen carefully to the section you want to fix and make note of the specific points where you need to punch in or out. Then, use your editing software to create the necessary cuts and make your corrections before stitching the sections back together.
Editing For Timing
Finally, when editing your bass tracks, it is crucial to pay close attention to the timing of your recordings. Bass is an instrument that is often responsible for providing the foundation and rhythm of a song, so it’s important that your timing is spot-on. To edit for timing, listen to your recordings carefully and use a metronome to identify any portions that are out of sync. Once you’ve identified the problematic areas, use your editing software to adjust the timing as needed until everything aligns perfectly.
Exporting Your Bass Tracks
After recording your bass tracks at home, the next step is to export them. Exporting your bass tracks is an important task because it allows you to use them in your mix. In this section, we will discuss how to prepare your tracks for export, the export settings, and how to use your bass tracks in a mix.
Preparing Your Tracks For Export
Before exporting your bass tracks, it’s important to make sure they are properly named, labeled, and organized. This will make it easier to find and use them in your mix. Here are some tips on how to prepare your tracks for export:
- Make sure the track names are descriptive and easy to understand.
- Label each track with the instrument name and the number of takes.
- Keep your tracks organized by grouping them into folders.
- Trim the beginning and end of each track to remove any unnecessary noise.
Export Settings
When it comes to exporting your bass tracks, there are a few settings you need to pay attention to. Here are some export settings you should consider:
| Setting | Description |
|---|---|
| File Format | You can choose between different file formats such as WAV, MP3, or AIFF. WAV files are recommended for high-quality audio. |
| Sample Rate | The sample rate determines the quality and size of the audio file. For most recording projects, a sample rate of 44.1 kHz is sufficient. |
| Bit Depth | The bit depth determines the dynamic range and resolution of the audio file. For most recording projects, a bit depth of 24 bits is recommended. |
Using Your Bass Tracks In A Mix
Now that you have exported your bass tracks, it’s time to use them in your mix. Here are some tips on how to use your bass tracks in a mix:
- Import your bass tracks into your digital audio workstation (DAW).
- Adjust the volume, panning, and EQ of your bass tracks to fit in with the rest of the mix.
- Use compression to even out the dynamics of your bass tracks.
- Apply effects such as reverb or delay to add depth and character to your bass tracks.
- Remember to save your mix as you go, and take breaks to rest your ears.

Credit: www.soundonsound.com
Frequently Asked Questions On Recording Bass At Home
How Can I Record Bass At Home?
Record bass at home by investing in a USB audio interface, a microphone, a DAW, and quality instrument cables. You can also experiment with microphone placement, room acoustics, and using different amplifiers and pedals to achieve the desired sound. Practice and proper technique can also improve the quality of your recordings.
What Do You Need To Record Bass?
To record bass, you will need equipment such as a bass guitar, a bass amp, and a microphone. You’ll also need an audio interface and a recording software to capture the sound. It’s important to experiment with microphone placement and settings to achieve the desired sound.
How Do I Record Bass On My Computer?
To record bass on your computer, you’ll need a DAW software like GarageBand, a bass guitar with a direct input or microphone, and an audio interface. Connect your bass to your computer using the audio interface, open your DAW software, create a new project, and select the input source as your audio interface.
Arm the track, hit record, and start playing.
Do You Need A Preamp For Recording Bass?
Yes, you will need a preamp for recording bass as the output of a bass guitar is not strong enough to be directly recorded. A preamp boosts the signal level, making it louder and clearer. It also enables mixing and EQ adjustments during the recording process.
Conclusion
Recording bass at home is not a hard nut to crack. With the right setup and techniques, you can achieve a professional sounding track that will make you proud. Remember to keep experimenting with different setups and plugins until you find the perfect match for your tone.
Don’t forget to also learn from other bassists and keep improving your skills. Happy recording!