To export stems in Ableton Live, click on File, then choose Export Audio/Video. From there, select the tracks you want to export and adjust any necessary settings.
Ableton Live is a popular digital audio workstation used by producers and engineers for music creation. It is known for its intuitive interface and innovative features. Exporting stems from Ableton Live is a necessary step for sharing your music or collaborating with other artists.
Stems refer to individual audio tracks that are usually grouped together based on instrument or effect. Exporting stems allows for greater flexibility in mixing and mastering, as well as easier collaboration with other musicians. We will discuss the steps needed to export stems in Ableton Live.

Credit: m.youtube.com
Preparing Your Project
To prepare your project for exporting stems in Ableton Live, first make sure all elements are organized and properly labeled. Then select the individual tracks you want to export as stems and adjust the levels and effects accordingly. Finally, use Ableton’s Export Audio/Video function and select the “Stems” option to export each track as a separate audio file.
Preparing Your Project: Before exporting stems in Ableton Live, it’s important to prepare your project thoroughly to ensure a seamless and efficient process. The following steps outline how to best prepare your project for exporting stems in Ableton Live. Consolidating Tracks: The first step in preparing your project for exporting stems in Ableton Live is to consolidate your tracks. This involves merging multiple audio clips into one audio file, which not only saves disk space but also ensures that all clips are in sync. To consolidate tracks in Ableton Live, simply select the tracks you want to consolidate, right click, and select “Consolidate”. Alternatively, use the shortcut key “Ctrl + J” on Windows or “Cmd + J” on Mac. Naming Tracks: Next, you should ensure that each track is named correctly. This makes it easier to identify each stem during the exporting process and saves time in the long run. To rename a track in Ableton Live, simply double-click on the track name and type in the desired name. Setting Individual Levels: Lastly, set the individual levels for each stem. This ensures that each stem is exported at the desired volume, and prevents any clipping or distortion. To adjust individual track levels in Ableton Live, simply use the volume fader on each track. By following these steps, you can ensure that your project is well-prepared for exporting stems in Ableton Live. This will save time, prevent any potential issues, and ultimately lead to a better end result.
Credit: loopcommunity.com
Export Settings
To export stems in Ableton Live, navigate to the Export Settings. Here, you can select the type of file, quality, and channels to export your stems. It’s essential to have correctly exported stems for better mixing and mastering of your music productions.
Selecting The Right File Type
Before exporting stems in Ableton Live, it is important to select the right file type. This decision depends on the project’s intended use and your personal preference. The following are the common file types that you can use to export stems in Ableton Live:
- WAV
- AIFF
- MP3
WAV and AIFF are lossless audio formats that retain all the audio data from the original file. On the other hand, MP3 is a compressed audio format that discards some of the audio data for a smaller file size. However, MP3 files are compatible with most media players, making them a good choice for sharing or streaming your mixes.
Choosing Bit Depth And Sample Rate
When exporting stems in Ableton Live, you also need to choose the bit depth and sample rate. Bit depth refers to the number of bits used to represent each sample of audio. The higher the bit depth, the greater the dynamic range and the better the sound quality. Sample rate, on the other hand, refers to the number of samples per second. The higher the sample rate, the more detail and accuracy in the audio. Here are the recommended settings for exporting stems in Ableton Live:
| File Type | Bit Depth | Sample Rate |
|---|---|---|
| WAV / AIFF | 24 bit | 44.1 kHz |
| MP3 | 16 bit | 44.1 kHz |
Considerations For Mastering
When exporting stems for mastering, there are a few things to consider. Firstly, it is important to leave enough headroom in the mix to allow the mastering engineer to make adjustments without causing distortion. Secondly, you can export multiple versions of the same stems with different EQ settings, allowing the mastering engineer to choose the best version for your project. Lastly, you should communicate any specific requirements or preferences to the mastering engineer beforehand to ensure the best outcome for your project. Exporting stems in Ableton Live is an essential skill for any producer or musician. By selecting the right file type, choosing the appropriate bit depth and sample rate, and considering the requirements for mastering, you can ensure that your stems are of the highest quality and ready for any application.
Exporting Stems
To export stems in Ableton Live, simply select the tracks you want to export and then choose “Export Audio/Video” from the “File” menu. From there, you can select your export settings and file format, and choose whether to export each track as a separate stem or all stems together.
It’s a quick and easy way to get high-quality individual tracks for mixing and mastering.
Exporting stems in Ableton Live is an essential technique every producer should know. Stems are individual audio files that contain a specific group of sounds within a track. Exporting stems is particularly useful for those who collaborate with other producers or for those who want to prepare their project for mixing and mastering. In this article, we will show you how to export individual tracks and groups in Ableton Live.
Exporting Individual Tracks As Stems
To export individual tracks as stems, take the following steps:
- First, make sure that the track you want to export is soloed.
- Head to the beginning of the track and set the left and right locators to the beginning and end of the track, respectively.
- Right-click on the track that you want to export in the Arrangement view and select “Freeze Track.” This process will render the track into an audio file.
- Right-click on the frozen track and select “Flatten.”
- Finally, right-click on the flattened track and choose “Export Audio/Video.” Select the location where you want to save the file on your computer, and you’re done.
Exporting Groups As Stems
Exporting groups as stems is similar to exporting individual tracks as stems. The process is as follows:
- First, make sure you have grouped the tracks you want to export.
- Head to the beginning of the track and set the left and right locators to the beginning and end of the track, respectively.
- Right-click on the group track and select “Freeze Track.” This process will render the tracks within the group into an audio file.
- Right-click on the frozen track and select “Flatten.”
- Finally, right-click on the flattened track and choose “Export Audio/Video.” Select the location where you want to save the file on your computer, and you’re done.
In conclusion, exporting stems in Ableton Live is an easy process once you get the hang of it. Whether you’re exporting individual tracks or groups, you’ll have the flexibility and ease of sharing your projects.
Credit: help.ableton.com
Organizing And Sharing Your Stems
Learn how to export stems in Ableton Live and keep them organized and easy to share with others. This can save time and stress when collaborating with other musicians or sending files to clients.
If you’re an Ableton Live user, you already know that exporting stems can be a critical aspect of working on a track or project. Whether you want to share your stems with collaborators, send them to a mixing and mastering engineer, or just back them up for safekeeping, knowing how to export stems in Ableton Live is essential.
Naming And Tagging Stems
Before you export your stems, it’s essential to name them correctly. Choose descriptive and straightforward names to help you and anyone else who will be working with your stems remember what they are. Consider using consistent naming conventions across all of your tracks to keep things organized and easy to find. In addition to naming your stems, you can also tag them with specific attributes to make them easier to organize and search. For instance, you could use tags to designate certain stems as “drums,” “bass,” or “vocals,” making it easy to search for and find those elements later.
Creating Folders
Organizing your stems into folders is another great way to keep things organized. You could create a folder for each track, or group stems together based on their function (e.g., drums, bass, synths, etc.). Folders make it easy to find and access specific stems when you need them and keep things neat and tidy.
Sending Stems For Mixing And Mastering
When it’s time to send your stems out for mixing and mastering, it’s essential to follow a few best practices to ensure everything goes smoothly. Firstly, be sure to communicate with your mixing and mastering engineer to ensure they understand what you’re looking for. You can also provide notes or a reference track to help them get an idea of your vision. When exporting your stems, be sure to export them at the highest possible quality. Aim for 24-bit/48kHz or higher, and export each stem with a consistent level and normalization setting. This helps ensure that all of your stems have a consistent volume level and will sound balanced when mixed together. In Conclusion, organizing and sharing stems is a vital part of any Ableton Live workflow. By naming and tagging your stems, creating folders, and following best practices when exporting your stems, you can ensure that your project runs smoothly and sounds great when it’s finished.
Frequently Asked Questions Of How To Export Stems In Ableton Live
How Do I Export Stem Files From Ableton?
To export stem files from Ableton, simply go to the “File” menu and select “Export Audio/Video”. From there, choose the individual tracks or groups you want to export as stems, set your desired parameters, and click “Export”. Your stems will be saved in the designated folder.
How Do I Export Stem?
To export a stem, you need to select the track containing the stem, click on “File,” then select “Export. ” Choose the desired file format, name the file and select the destination folder. Finally, click “Export” to complete the process.
How Do You Bounce Down Stems In Ableton?
To bounce down stems in Ableton, select the audio track you want to bounce down, then go to “File” and click “Export Audio/Video. ” Choose the desired settings for the stem, then click “Export” to create a new audio file of the stem.
Repeat the process for each audio track you want to bounce down.
How Do I Export Selected Tracks In Ableton?
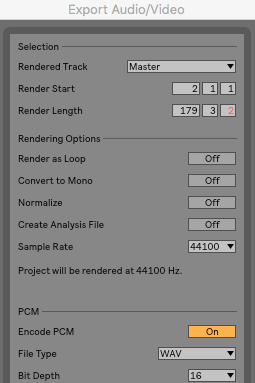
To export selected tracks in Ableton, first select the tracks you want to export. Then go to the “File” menu and choose “Export Audio/Video”. In the Export Audio/Video window, select “Selected Tracks Only” from the “Rendered Track” drop-down menu. Adjust your settings as desired, then click “Export”.
Conclusion
Exporting stems is an essential skill for musicians, producers, and sound engineers who want to create professional music. In Ableton Live, stem exporting is an essential feature that helps you to collaborate with other musicians and work on your projects.
By following the guidelines mentioned above, you can easily export your tracks in Ableton Live and share them with other producers and sound engineers. So go ahead and try it for yourself! The world is waiting for your music.