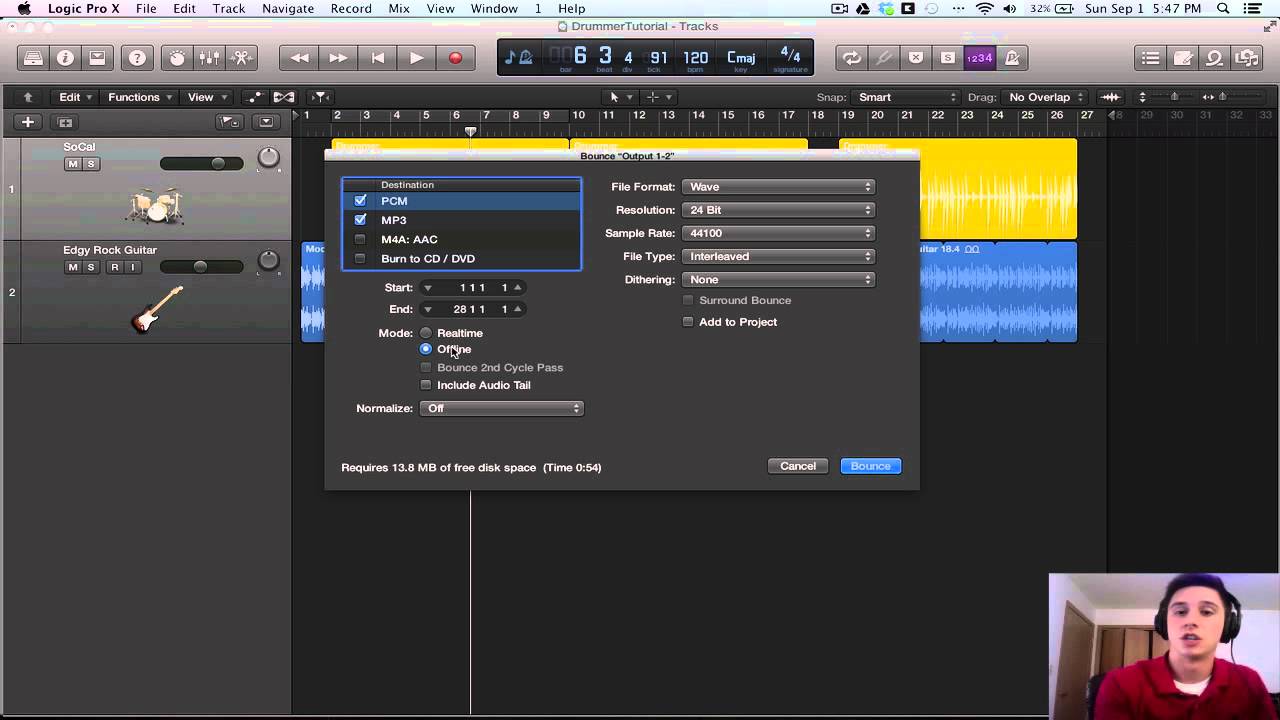
To properly bounce audio, select the appropriate settings for file format, bit depth, and sample rate. Bouncing audio is a common task in music production that involves exporting a mix or a single track as a new audio file.
When getting ready to bounce the audio, it’s essential to pay attention to the settings used. The file format selected should be appropriate for the intended use of the audio, whether it’s for streaming or a professional recording. Choosing the correct bit depth is vital, as higher bit depths will offer a greater dynamic range and decreased noise.
The sample rate determines the quality of the audio and the frequency response, and it’s essential to ensure that the sample rate selected matches the recording’s sample rate. By selecting the appropriate settings, you can ensure that your bounced audio is of high quality and meets the intended use.
Benefits Of Setting Before Audio Bouncing
Setting to use when bouncing audio brings numerous benefits such as a better mix and easier mastering process. Some of the key settings include sample rate, bit depth, dithering, and normalization. By setting these parameters correctly before bouncing, you can ensure a high-quality final product.
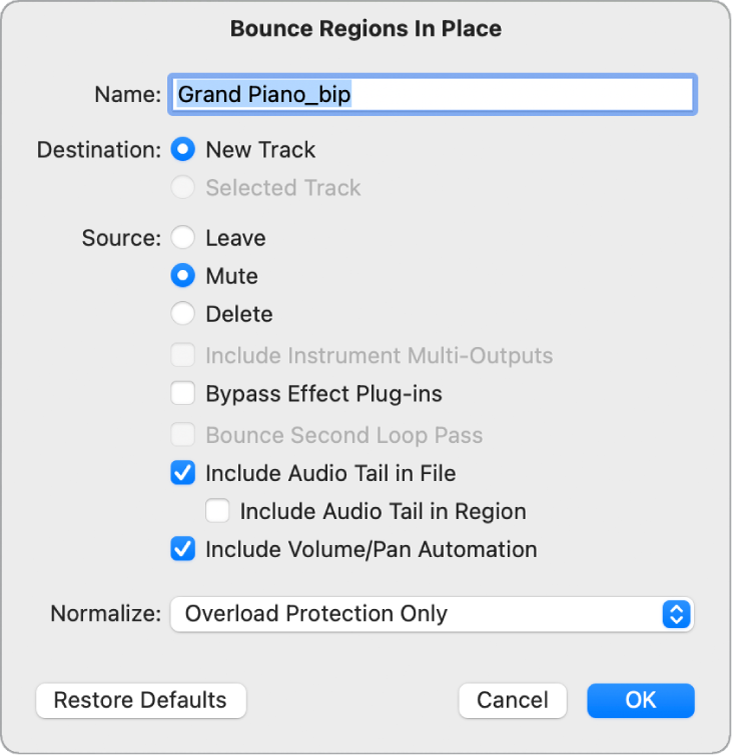
Audio bouncing is the process of exporting and rendering a mix to a single audio file. It is an essential step in the music production process. Before bouncing your audio, it’s crucial to set the right parameters to ensure that your mix is consistent and well-balanced.
Ensure Consistency
By setting the right parameters before bouncing your audio, you can ensure consistency in your mix. You can set the levels, panning, and apply EQ and compression to create a more balanced mix. This will result in a more polished and professional-sounding final product. Consistency is key in music production, and setting parameters before bouncing your audio is an excellent way to achieve it.
Save Time And Money
One of the main benefits of setting parameters before bouncing your audio is that it saves you time and money. If you don’t set your parameters correctly, you may end up with an unbalanced mix, which would require additional mixing and mastering. This will increase the time and money spent on the production process. By setting your parameters correctly, you can avoid having to go back and make changes, saving you valuable time and money.
Quickly Preview Mix, Ensuring Each
Another benefit of setting parameters before bouncing your audio is that it allows you to quickly preview your mix. You can listen to the mix and make sure that each element is well-balanced and that nothing is too loud or too quiet. By previewing your mix before bouncing, you can make any necessary adjustments to create a well-balanced and polished final product. In conclusion, by setting parameters before bouncing your audio, you can ensure consistency within your mix, save time and money, and quickly preview your mix to ensure that everything sounds great. It is a crucial step in the music production process that should not be overlooked.
Common Settings For Audio Bouncing
When bouncing audio, it’s important to use the right settings to produce the desired outcome. Common settings include selecting the file type, bit depth, sample rate, dithering, normalizing, and rendering options. These settings can affect the quality and compatibility of the final audio file.
Audio bouncing is an important step in the music production process. It is the process of mixing and rendering audio tracks into one final audio file. When bouncing audio, there are several settings that you need to be aware of to ensure that you get the best possible sound quality. In this blog post, we’ll discuss the most common settings that you should pay attention to when bouncing audio. The file format that you use when bouncing your audio is crucial. The two most common file formats that are used in the music industry are WAV and MP3. WAV files are uncompressed and offer the best quality, but they also have a large file size. MP3 files, on the other hand, are compressed and have a smaller file size, but the quality is not as good as WAV files. When bouncing your audio, you should choose the file format that best suits your needs. The bit depth of your audio file determines the dynamic range, which is the difference between the quietest and loudest parts of the audio. A higher bit depth means a larger dynamic range and better quality audio. The most common bit depths used in the music industry are 16-bit and 24-bit. For most applications, a 16-bit depth is sufficient, but if you want the highest possible quality, then a 24-bit depth is recommended. The sample rate of your audio file determines the frequency at which the audio is captured. A higher sample rate means that more audio is captured, resulting in a higher quality audio file. The most common sample rates used in the music industry are 44.1 kHz and 48 kHz. For most applications, a 44.1 kHz sample rate is sufficient, but if you are working on a project that requires the highest quality, then a 48 kHz sample rate is recommended. Dithering is a process that helps to reduce noise and distortion when converting audio from a higher bit depth to a lower bit depth. When bouncing your audio, you should always use dithering to help maintain the quality of your audio. There are several different types of dithering, but the most common is called “triangular” dithering. In conclusion, when bouncing your audio, you should pay close attention to the file format, bit depth, sample rate, and dithering settings. By using the right settings, you can ensure that your final audio file is of the highest possible quality.
File Format
When setting the file format to use when bouncing audio, it’s important to consider the quality of the final product as well as the compatibility with other devices. Using a lossless format such as WAV or AIFF can ensure high quality, while using a compressed format such as MP3 can save space and increase portability.
When it comes to bouncing audio, choosing the right file format is essential. Different file formats have different properties that can affect the final sound quality, compatibility, and file size. In this article, we will discuss the four most common file formats used for bouncing audio – WAV, AIFF, MP3, and AAC.
Wav
WAV (Waveform Audio File Format) is a popular uncompressed audio format that is widely used in recording studios. It preserves the original sound quality and is compatible with most digital audio workstations and media players. However, due to its uncompressed nature, WAV files can be very large in size, making them not ideal for sharing or streaming over the internet.
Aiff
AIFF (Audio Interchange File Format) is another uncompressed audio format that is popular among Mac users. It offers similar sound quality as WAV files but is more compatible with Mac-based applications and systems. Like WAV, AIFF files are also large in size.
Mp3
MP3 (MPEG-1 Audio Layer 3) is a compressed audio format that is widely used for sharing and streaming audio over the internet. It uses lossy compression, which means some audio information is lost during the compression process. This results in a smaller file size but lower sound quality compared to uncompressed formats. However, modern MP3 encoders can produce high-quality MP3 files with a bit rate of 320 kbps.
Aac
AAC (Advanced Audio Coding) is a compressed audio format that was designed to be the successor of MP3. It uses more advanced compression algorithms and can achieve higher sound quality with smaller file sizes compared to MP3. AAC is the default audio format used by Apple for its iTunes Store and Apple Music service. In conclusion, choosing the right file format when bouncing audio is crucial to ensure the best possible sound quality and compatibility. Consider the specific requirements of your project and the intended use of the audio file when deciding which format to use.
Credit: www.youtube.com
Bit Depth
Bit depth is an important setting to consider when bouncing audio. It determines the resolution of the audio and how much detail can be captured. Choosing the appropriate bit depth can result in higher quality audio.
When it comes to bouncing audio, one of the essential settings to keep in mind is the bit depth. Bit depth refers to the number of bits used to represent each sample of audio. This setting determines the dynamic range and signal-to-noise ratio of your audio file. Choosing the right bit depth can significantly affect the quality of your audio output.
16-bit
16-bit audio is the most common bit depth used for CD-quality audio files. This setting provides a good balance between file size and audio quality. With 16-bit audio, each sample of audio is represented by 16 bits, which gives 65,536 possible amplitude levels. This is sufficient for most music and audio recordings.
24-bit
If you want higher-quality recordings or plan to do a lot of post-processing on your audio files, 24-bit audio is the way to go. With 24-bit audio, each sample of audio is represented by 24 bits, which gives 16,777,216 possible amplitude levels. This allows for greater dynamic range and a higher signal-to-noise ratio, resulting in clearer and more detailed audio recordings.
32-bit Float
32-bit float audio is typically used for professional audio production and mixing. This bit depth provides an even greater dynamic range and signal-to-noise ratio than 24-bit audio. With 32-bit float audio, each sample of audio is represented by a floating-point number, which gives a virtually unlimited number of amplitude levels. This allows for extremely precise audio processing and mixing, resulting in optimal audio quality. In conclusion, selecting the appropriate bit depth setting for bouncing your audio is crucial to achieving high-quality sound. Whether you choose 16-bit audio for CD-quality recordings or 32-bit float audio for professional audio production, selecting the right bit depth setting is critical to ensuring your audio recordings sound their best.
Sample Rate
Set the sample rate to 44. 1kHz when bouncing audio for CD or digital distribution. For high-quality audio playback and professional applications, choose a higher sample rate of 96kHz or 192kHz.
When it comes to bouncing audio, there are several settings that need to be considered to ensure the highest quality output. One of the most critical settings is the sample rate, which determines the frequency at which the audio is sampled per second. Different sample rates can affect the clarity and quality of the audio output. Let’s take a closer look at the most commonly used sample rates and the scenarios in which they are used.
44.1khz
The 44.1kHz sample rate is the standard for the music industry and is used for CDs and most digital audio files. This sample rate is suitable for music and is capable of reproducing most of the human audible frequency spectrum ranging from 20Hz to 20kHz. It is also the most efficient and compatible with the majority of digital audio workstations.
48khz
The 48kHz sample rate is commonly used for video production, film, and television. The higher sample rate provides superior sound quality, which is essential for capturing the full range of frequencies and dynamics in soundtracks.
88.2khz
The 88.2kHz sample rate is used in high-quality audio production for situations where the audio quality must meet or exceed commercial recording standards. This sample rate is suitable for recording and mixing live concerts, classical music, and other highly dynamic recordings.
96khz
Finally, the 96kHz sample rate is reserved for the most demanding situations, such as mastering and professional audio production. This sample rate provides the highest level of detail and clarity, which is beneficial when working with complex audio content, intricate arrangements, or highly dynamic instrumentation. In conclusion, selecting the appropriate sample rate is crucial for producing high-quality audio content. The purpose, nature, and intended use of the audio material will dictate which sample rate to use. However, understanding the different sample rates and their specifications is the first step in achieving optimal audio quality.

Credit: www.soundonsound.com
Dithering
Dithering is a setting to use when bouncing audio, which helps reduce distortion, noise, and other sound artifacts. It works by adding a little bit of random noise to the signal, which helps smooth out the sound and makes it sound more natural.
When it comes to audio production, there are a lot of technical terms that might seem overwhelming. Dithering is one of these terms, and it’s an important one to understand. In simple terms, dithering is a process used when bouncing audio that can result in higher sound quality.
What Is Dithering?
Dithering is the process of adding random noise to audio signals during digital-to-analog conversion. This may seem counterintuitive, but it is actually an important step to maintain sound quality when converting digital audio to analog. The addition of random noise helps to prevent distortion by rounding off any distorted bits that might occur during the conversion process.
Why Dithering Is Needed
Dithering is needed because of the nature of digital audio. Digital audio is made up of a series of ones and zeros, and during the digital-to-analog conversion process, some of those digits can be lost or altered. Without dithering, these lost or altered digits can result in audible distortion. Dithering ensures that any lost or altered digits are rounded off, resulting in smoother and more natural audio.
Types Of Dithering
There are two types of dithering: noise shaping and triangular. Noise shaping is a more advanced form of dithering that involves adjusting the level of the added noise to specific frequencies in order to minimize the audibility of the noise added. Triangular dithering is a simpler form that adds noise evenly across all frequencies. In conclusion, dithering is an important step in the audio production process that can result in higher sound quality. Understanding what it is and why it’s needed can help you create better-sounding audio. In addition, being aware of the different types of dithering available can help you choose the best option for your specific project.
Credit: support.apple.com
Frequently Asked Questions Of Setting To Use When Bouncing Audio
Does Bouncing Reduce Audio Quality?
Bouncing an audio file involves consolidating multiple tracks into a single audio file. While it does not inherently reduce audio quality, repeated bouncing can result in a loss of quality over time. Factors such as bit depth and sample rate also affect the final audio quality.
What Does Bouncing Audio Do?
Bouncing audio combines multiple tracks into one, making it easier to manage and edit. It’s a process of exporting or rendering audio tracks to a single audio file, which can be imported into a new session. This is useful for finalizing a mix or creating stems for further processing.
What Sample Rate Should I Bounce For Mastering?
For mastering, it is recommended to bounce at the same sample rate and bit depth as the original recording. However, some mastering engineers prefer working at higher sample rates for better resolution. Ultimately, it depends on your preference and the requirements of the project.
What Should Be Done Before Bouncing Any Song Containing An External Gear?
Before bouncing any song containing an external gear, it is essential to ensure that all external gear is properly calibrated. This should include checking the input and output levels of all gear and ensuring that they are balanced and operating at optimal levels.
Additionally, it’s a good practice to double-check all connections and cables to ensure that they are properly linked and grounded.
Conclusion
Audio bouncing is an essential part of the audio production process, and using the right settings can make a world of difference. By adjusting the bit rate, sample rate, and dithering options, you can ensure that your audio sounds the best it possibly can.
Remember to experiment with different settings to find the one that works best for your project. With these tips, you can achieve a more professional sound and take your audio production skills to the next level.