Drum programming with Ableton Live is an easy process that allows users to create drum patterns and loops. With an intuitive interface and various features, users can easily program drums in a variety of styles using a range of sounds and effects.
Ableton Live is a popular Digital Audio Workstation (DAW) that is widely used by music producers and artists worldwide. The software is feature-packed and offers a range of tools that allow users to create beats, melodies, and more. One of the key features of Ableton Live is its drum programming capability, which allows users to create intricate and complex drum patterns and loops with ease.
We will explore the various drum programming features of Ableton Live and explain how to use them to create professional-sounding drum tracks. Whether you are a beginner or an experienced musician, this guide will help you get started with drum programming in Ableton Live.
Setting Up For Drum Programming
Setting up for drum programming in Ableton Live involves selecting the right drum samples, creating a MIDI clip, and programming patterns using the step sequencer or MIDI editor. With Ableton’s powerful drum rack and automation features, you can easily create dynamic and unique drum tracks for your music productions.
Before we start with drum programming in Ableton Live, we need to set up our computer and MIDI devices to establish a seamless connection. Here are the three necessary steps to set up for drum programming in Ableton Live.
Installing Ableton Live
The first step in drum programming is installing Ableton Live on your computer. If you haven’t already done so, head over to the Ableton website and purchase the latest version of the software. After that, follow the instructions on the website to complete the installation process.
Connecting Midi Devices
Once Ableton Live is installed, the next step is to connect your MIDI device. In Ableton Live, MIDI devices are used to send signals to the computer, which then triggers the sounds of the drum samples. To connect your MIDI device, connect the MIDI cable from your MIDI device to the MIDI In port on your audio interface. Make sure all the connections are firmly attached.
Selecting Drum Samples
After connecting your MIDI devices, the next step is to select the drum samples you want to use in your project. Ableton Live comes with a pre-set library of drum samples, but you can also purchase additional samples from third-party providers or record your own. Once you have selected the samples you want to use, you can start programming your drums.
In conclusion,
Setting up your computer and MIDI devices to work with Ableton Live is an essential step in drum programming. By following the above three steps, you will be equipped to program drums effortlessly. With the right tools and resources, producing fantastic drum sounds and rhythms is a breeze.

Credit: www.productionmusiclive.com
Creating Drum Patterns
Mastering drum programming with Ableton Live requires a keen ear for rhythm and a creative approach. Experiment with different sounds, patterns, and effects to bring your beat to life. With Ableton Live’s intuitive interface and built-in effects, you can easily craft compelling drum patterns that elevate your music production.
Drum programming is a vital part of producing electronic music, and it’s crucial to create drum patterns that are engaging, exciting, and perfectly synced with your track. In this blog post, we’ll be focusing on creating drum patterns using Ableton Live.
Choosing A Tempo And Time Signature
Before creating a drum pattern, it’s essential to choose the tempo and time signature of your track. The tempo sets the speed of the track, while the time signature controls the rhythm. Ableton Live makes it easy to choose the tempo and time signature by providing a dedicated section in the transport bar. Here’s how to set the tempo and time signature in Ableton Live:
- Click on the ‘1/4’ icon in the transport bar to access the tempo and time signature menu
- Enter your desired tempo in the ‘BPM’ field or use the up and down arrows to adjust the tempo in small increments
- Select your desired time signature from the drop-down menu. You can choose from standard time signatures like 4/4, 3/4, 6/8, or create your own custom time signature
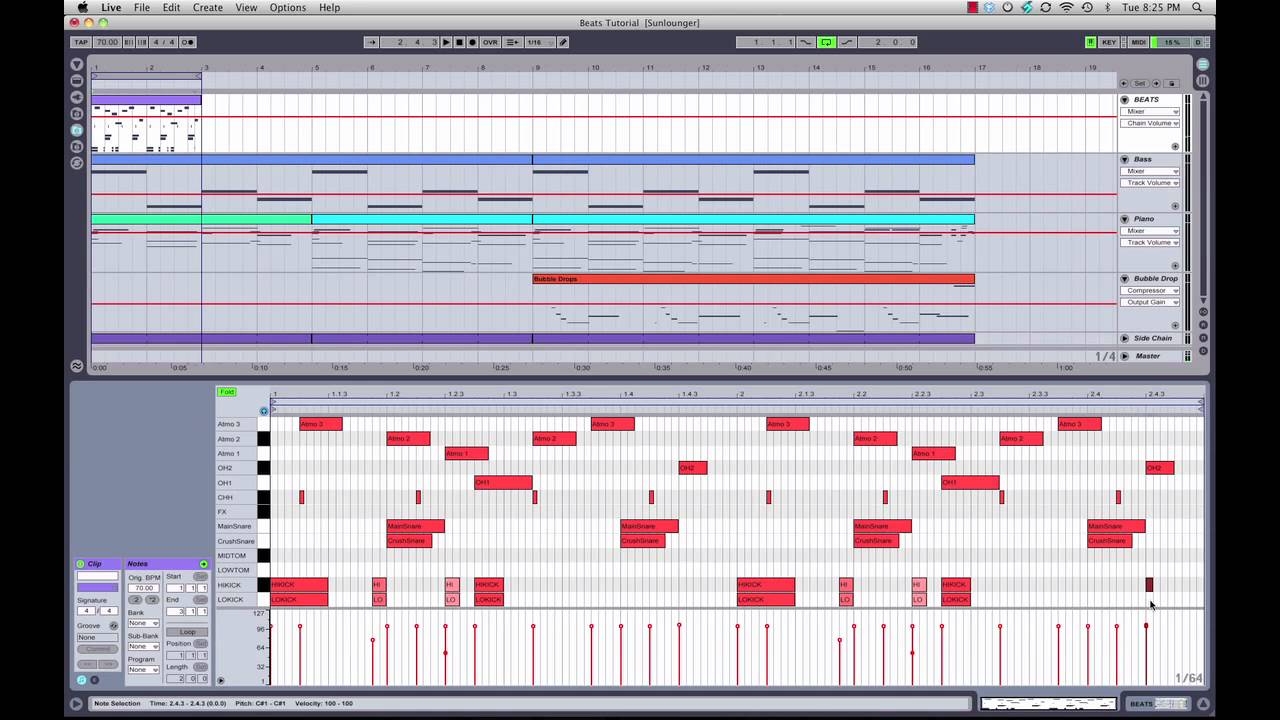
Creating A Basic Drum Loop
Once you’ve set the tempo and time signature, it’s time to create a basic drum loop. A drum loop is a repeating pattern of drum sounds that form the backbone of your track. Here’s how to create a basic drum loop in Ableton Live:
- Drag a drum kit onto an empty MIDI track
- Double-click on the MIDI clip to open the MIDI editor
- Select the pencil tool from the toolbar and draw in your drum pattern on the grid
- Click on the play button to hear your drum loop
Adding Variations And Fills
Once you’ve created a basic drum loop, it’s time to add some variations and fills to make the pattern more interesting. Variations are subtle changes in the pattern, while fills are short, intense patterns that add emphasis to specific points in the track. Here’s how to add variations and fills in Ableton Live:
- Duplicate the original drum pattern to create a new clip
- Add or remove drum hits to create variations in the pattern
- Program fills by adding short, intense patterns at the end of a measure or before a breakdown
- Use automation to add effects like filter sweeps or pitch changes to the drum pattern
In conclusion, creating drum patterns with Ableton Live is easy and fun. By following these steps, you’ll be able to create engaging, dynamic, and perfectly synced drum patterns that will take your tracks to the next level.
Editing Drum Patterns
Editing your drum patterns is crucial to getting your beats just right. It allows you to tweak individual hits and develop a unique sound that sets you apart as a producer. With Ableton Live, drum programming has never been easier. Here’s how to get started with editing your drum patterns.
Using Ableton Live’s Editing Tools
Ableton Live’s editing tools make it easy to manipulate your drum patterns. Use the pencil tool to draw in hits, or the eraser tool to remove them. The cut tool lets you slice up your drum patterns, so you can rearrange them or create new rhythms altogether. You can also copy and paste patterns to duplicate them or use them as a starting point for something new. These tools can take some time to master, but once you get the hang of them, you’ll be able to make your beats sound exactly the way you want them to.
Adjusting Quantization And Groove Settings
Quantization and groove settings are essential to creating a tight and groovy beat. Quantization allows you to snap your hits to a specific rhythmic grid, ensuring a precise and consistent sound. Adjusting the groove setting allows you to add swing and shuffle to your patterns, making them feel more organic and human-like. Don’t be afraid to experiment with different settings to find the perfect groove for your beat.
Applying Swing And Humanization
Adding swing and humanization to your drum patterns is a great way to give your beats a more natural feel. Swing refers to the subtle deviation of rhythm that occurs when playing drums. In Ableton Live, you can use the “swing” feature to add that same human-like feel to your patterns. Humanization refers to the randomization of hit velocity and timing, making your patterns sound less robotic and more authentic. By applying these techniques, your beats will sound more dynamic and less rigid.
With these techniques, you can take your drum programming to the next level. By using Ableton Live’s editing tools, adjusting quantization and groove settings, and applying swing and humanization, you can create beats that stand out and capture your unique sound.
Credit: www.ableton.com
Manipulating Drum Samples
One of the most important aspects of drum programming is the ability to manipulate your drum samples. With Ableton Live, you have a ton of tools at your disposal to shape your drums and create unique sounds that can take your tracks to the next level.
Using Effects And Processing
One of the most effective ways to manipulate your drum samples is by using effects and processing tools. Ableton Live comes with a wide variety of effects to choose from, including EQ, compression, distortion, and reverb.
For example, you could use EQ to boost the low-end frequencies of a kick drum, giving it more weight and power. Or you could use distortion to add grit and edge to a snare drum, making it cut through a mix more effectively.
When it comes to processing, you can use techniques like parallel compression to bring out the best in your drum samples. This involves duplicating your drum track, compressing one copy heavily and leaving the other uncompressed, and then blending the two together for a thicker, punchier sound.
Layering Samples
Another way to manipulate your drum samples is by layering them together. This involves taking multiple drum samples and blending them to create a single, more complex sound.
For example, you could layer a snappy snare drum on top of a longer, more sustained snare to create a unique hybrid sound. Or you could layer multiple kick drums together to create a bigger, more powerful kick sound.
Layering can be a great way to make your drums stand out and add more personality to your tracks.
Pitching And Filtering
Finally, you can also manipulate your drum samples by adjusting their pitch and filtering them. This can help you create unique and interesting sounds that stand out from the crowd.
For example, you could pitch down a snare drum to create a deep, resonant sound. Or you could filter out the highs of a hat sample to create a more muted, aggressive sound.
Experimenting with pitching and filtering can be a great way to find new and interesting sounds for your tracks.
Advanced Drum Programming Techniques
Advanced Drum Programming Techniques:
Drum programming can be a challenging task for many producers, but with Ableton Live, you can create complex rhythms with ease. In this article, we will focus on some advanced drum programming techniques that will take your beats to the next level.
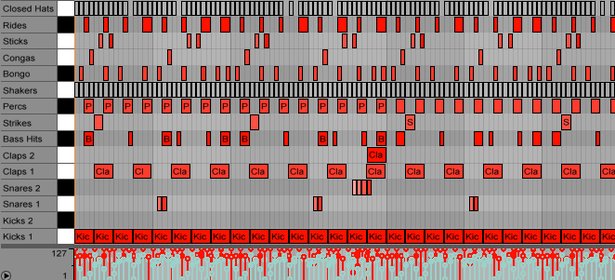
Creating Complex Rhythmic Patterns:
One of the most exciting parts of drum programming is creating intricate and complex rhythms. With Ableton Live, you can create unique patterns by using the Drum Rack’s step sequencer or by drawing MIDI notes directly on the Clip View. Additionally, you can use the Random MIDI Effect to generate unpredictable rhythms.
To further enhance the complexity of your rhythms, you can utilize the Velocity MIDI Effect to adjust the strength of each hit, as well as the Probability MIDI effect to control the chance of a note being played. These tools help you create even more intricate patterns that will make your tracks stand out.
Using MIDI Effects:
Another way to achieve advanced drum programming in Ableton Live is to make use of the numerous MIDI effects available. The arpeggiator, for instance, is a popular tool that can help you create complex patterns by arpeggiating incoming notes and adding swing to your beat.
The MIDI Gate Effect can be used to chop up your drum loops, creating intricate patterns that add variety and excitement to your track. Additionally, the Chord MIDI Effect can help you create chord progressions and harmonies, adding a unique vibe to your drums.
Integrating Live Drumming:
To make your drum programming even more advanced, you can also integrate live drumming into your tracks. Ableton Live makes this process seamless with its built-in audio to MIDI conversion feature, allowing you to turn any audio file into a MIDI clip.
You can also trigger samples or loops using a MIDI pad or drum machine, creating a more natural and human feel to your beats. By layering these live drums with your programmed beats, you can create unique and dynamic grooves that will take your track to the next level.
With these advanced drum programming techniques, you can create unique and complex rhythms that will keep your listeners engaged and excited. Whether you choose to draw MIDI notes directly on the Clip View or incorporate live drumming into your tracks, Ableton Live has the tools you need to create advanced beats that stand out from the crowd.
Tips And Tricks
Drum programming is an essential part of making electronic music. It’s a creative process that allows you to create unique drum patterns that fit your music style. In Ableton Live, you have a wide range of tools and features that can help you take your drum programming skills to the next level. In this article, we will explore some tips and tricks that will help you create amazing drum patterns in Ableton Live.
Organizing Drum Samples In Ableton Live
Organizing your drum samples is crucial when it comes to creating music. A well-organized sample library can save you a lot of time and help you find the right sounds quickly. In Ableton Live, you can organize your samples in the ‘Places’ section of your browser.
Example:
| Folder Name | Description |
|---|---|
| Kicks | Contains all the kick drum samples |
| Snares | Contains all the snare samples |
| Hats | Contains all the hi-hat samples |
Using Drum Racks
Drum Racks are a powerful tool in Ableton Live that can help you organize and control your drum sounds. A Drum Rack is a container for multiple drum samples that you can play using your MIDI controller or computer keyboard. You can add effects, automate parameters, and use MIDI effects to manipulate the sounds in your Drum Rack.
To create a Drum Rack in Ableton Live:
- Drag and drop your drum samples onto an empty MIDI track.
- Select all the samples on the track.
- Right-click and select ‘Group Tracks’.
- Choose ‘Drum Rack’ from the available options.
Maximizing Cpu And Memory
When working on complex projects, you may encounter performance issues due to high CPU and memory usage. To optimize your workflow and prevent crashes, follow these tips:
- Freeze tracks that are not in use.
- Turn off plugins or effects that you are not using.
- Use the ‘Reduce latency when monitoring’ option to minimize latency while recording.
- Use the ‘Warp’ feature only on the tracks that require it.
By following these tips, you can ensure that you get the best performance out of Ableton Live while working on your drum programming projects.
Credit: m.youtube.com
Frequently Asked Questions On Drum Programming With Ableton Live
Can You Program Drums In Ableton?
Yes, Ableton has a built-in Drum Rack feature that allows you to program drums using MIDI or audio samples. You can also use the step sequencer or play in real-time with a MIDI controller.
How Do You Program Drum Fills In Ableton?
To program drum fills in Ableton, first, select the drum pattern where you want to insert fills. Then, create a new MIDI clip and insert it into the drum track. Next, select a drum fill that you like and drag it to the clip.
Finally, adjust the length of the fill to fit the space where you want it to go.
Does Ableton Have A Drum Machine?
Yes, Ableton has a built-in drum machine called ‘Drum Rack’ which allows users to create and customize their own drum kits using their own samples or those provided by Ableton.
How Do I Make My Drums Sound Real In Ableton?
To make your drums sound real in Ableton, adjust velocity, add humanization, use swing and groove, layer samples, and use effects like reverb and delay. Take advantage of Ableton’s built-in features like Multiband Dynamics and Drum Buss to create a real drum sound.
Conclusion
As a music producer, you already know how valuable a drum programmer tool like Ableton Live can be. Learning how to program drums effectively can enhance your productions, allowing you to create unique and professional-sounding tracks. With the essential tips shared in this post, you’re now equipped with the knowledge to create dynamic grooves, manipulate drum samples, and expand your creativity.
Keep practicing and experimenting, and you’ll see your drum programming skills elevate to the next level.