To mix and master in FL Studio, use EQ, compression, saturation, and limiters. Mixing is the process of balancing the different tracks, while mastering is the final stage of polishing and enhancing the mix.
With FL Studio, you can accomplish both tasks in a single software, making it a popular choice among producers and audio engineers. Whether you are working on a music project or a podcast, mastering your mix can help take the final product to the next level and make it stand out from the crowd.
We will explore some tips and tricks for mixing and mastering in FL Studio, as well as some essential plugins to help you achieve a professional sound.
Understanding The Mixing Process In Fl Studio
Understanding the mixing process is crucial when it comes to creating a professional sound in FL Studio. With the right tools and techniques, you can master the art of mixing and produce high-quality tracks. By adjusting levels, applying effects, and using EQ, you can create a balanced and polished final product.
As a music producer, mixing and mastering is a vital part of your music creation process. While recording can be exciting and inspiring, the key to making your music sound polished and professional rests on how you mix and master it. In this article, we will focus on the first part of the process – mixing. We’ll look into the basic tools and techniques required for mixing in FL Studio. So, let’s dive in!
Step-by-step Guide To Mixing In Fl Studio
Here is a quick rundown of the steps involved in mixing in FL Studio:
- Import and organize your audio clips in the Playlist
- Ensure your levels are balanced
- Add effects to each mixer track (EQs, compressors, reverb, etc.)
- Pan each mixer track in the stereo field
- Create automation clips for volume and effects
- Export your mix as WAV or MP3
Basic Tools And Techniques For Mixing In Fl Studio
For an effective mixing process, it is essential to have the right tools and techniques to bring out the best in your music. Here are some basic tools and techniques:
Tools:
- Playlist: FL Studio’s main arrangement window.
- Mixer: The mixer allows you to control the volume, panning, and effects of each track.
- EQ: Used to adjust the frequency balance of a track to improve clarity and definition.
- Compressor: Used to balance the dynamic range of a track.
- Reverb: Used to add natural-sounding ambience to a track.
Techniques:
- Gain-staging: The process of ensuring each mixer track is at the appropriate volume level.
- Panning: Placing tracks in the left, right, or center position of the stereo field to create space and improve separation between instruments.
- Automation: The process of changing a parameter over time, using clips or curves, to add interest and dynamics to your mix.
- Mono compatibility: Ensuring that your mix sounds good in both mono and stereo can help avoid any phase cancellation issues when played through various playback devices.
By understanding the basic tools and techniques and following the steps outlined above, you can successfully create a well-balanced mix in FL Studio. Happy mixing!
Credit: www.youtube.com
Mastering In Fl Studio
Mastering in FL Studio is a crucial step in ensuring that your music productions sound professional and polished. With the right techniques and tools, you can effectively mix and master your music in FL Studio to achieve a high-quality final product that stands out in the industry.
The Role Of Mastering In Music Production
Mastering is the final process in music production where a finished mix is enhanced and optimized for distribution across various platforms. The goal of mastering is to ensure a consistent and polished sound, and to make sure that the track sounds great on all types of speakers. The mastering process can make a huge difference in the final output of a track, and can even elevate a good mix to the next level. Here are some tips and techniques for mastering in FL Studio.
Mastering Tips And Techniques In Fl Studio
1. Start with High-Quality Mix
Before mastering, make sure that the mix has been properly leveled, equalized, and compressed. It’s important to work on a high-quality mix to achieve the best possible sound in the final master. 2. EQ and Compression
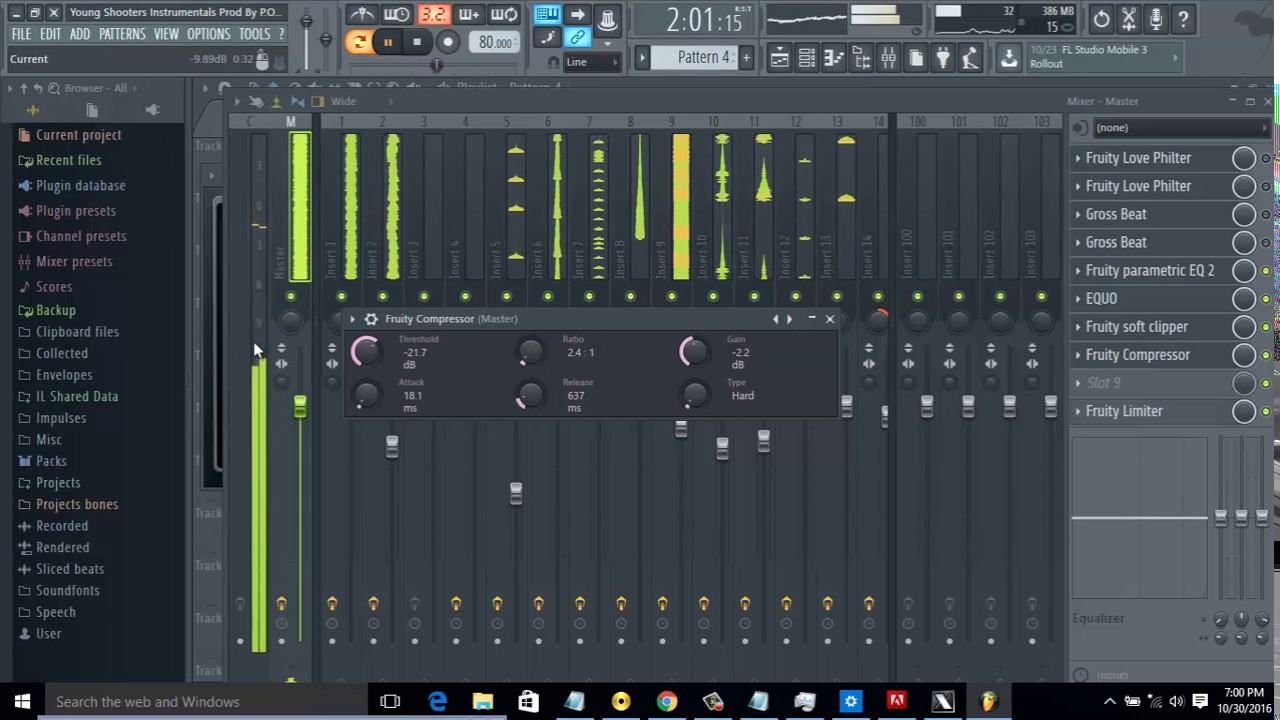
In FL Studio, EQ and compression are the main tools used for mastering. Use EQ to make small adjustments to the frequency balance, while compression can help control the dynamics and add some final polish to the mix. Be careful not to overuse compression, as it can easily lead to a squashed and lifeless sound. 3. Use Limiters with Caution
Limiters are tools used to prevent clipping in the final master. However, using limiters too aggressively can lead to distortion and loss of dynamics. To avoid this, use limiters with caution and always keep an eye on the gain reduction meter. 4. Reference Your Mix
Always reference your mix against a commercially released track, especially one in a similar genre to yours. This will help you better understand how your track stacks up against industry standards and identify any areas that need improvement. 5. Don’t Overdo It
It’s important to remember that mastering should enhance the mix, not completely change it. Avoid over-processing and over-equalizing, as this can lead to a muddled and unnatural sound. Keep the mastering process simple and subtle, and let the mix speak for itself. By following these tips and techniques, you can achieve a professional and polished sound in your final mastering process in FL Studio. Keep practicing and experimenting until you find the right balance that works for your tracks.
Working With Effects
Learn the art of mixing and mastering in FL Studio with the use of different effects. By understanding the functions of each effect and how to adjust them, you can achieve a professional sound to your music.
Working with Effects When it comes to mixing and mastering in FL Studio, effects play an essential role in creating a clean, professional sound. In this article, we’ll go over how to apply effects to individual tracks and the master channel, as well as the most common effects used in FL Studio mixing and mastering. Applying Effects to Individual Tracks and the Master Channel Applying effects to individual tracks is a crucial step in creating a polished sound in FL Studio. Here are the key steps:
- Open the mixer window by pressing F9 on your keyboard
- Select the track you want to add effects to
- Click on one of the available mixer slots to open the plugin picker
- Select the plugin you want to use and adjust the settings
- Repeat steps 2-4 for each effect you want to add
- Adjust the levels of each effect by dragging the slider up or down
When it comes to applying effects to the master channel, the process is quite similar. The key difference is that any effects you add to the master channel will affect the final output, rather than just a single track. Here’s how to do it:
- Open the mixer window by pressing F9 on your keyboard
- Select the master channel at the top
- Click on one of the available mixer slots to open the plugin picker
- Select the plugin you want to use and adjust the settings
- Repeat steps 2-4 for each effect you want to add
- Adjust the levels of each effect by dragging the slider up or down
Common Effects Used in FL Studio Mixing and Mastering There are countless effects you can use in FL Studio for mixing and mastering, but these are some of the most common:
| Effect | Description |
|---|---|
| EQ | Adjusts the levels of different frequencies within a track |
| Compression | Reduces the dynamic range of a track, making it sound more cohesive |
| Reverb | Creates a sense of space and adds depth to a track |
| Delay | Creates an echo effect and can be used to add rhythm or texture to a track |
| Saturation | Adds warmth and depth to a track by mimicking the sound of analog recording |
By utilizing these effects and applying them in a strategic way, you can take your FL Studio mixing and mastering game to the next level. Remember to experiment with different combinations and settings to find the perfect sound for your track.
Credit: www.youtube.com
Equalization (eq) And Compression
Achieving a balanced mix and master in FL Studio requires understanding and using two essential techniques: EQ and compression. EQ allows you to adjust the frequency balance of individual tracks or the entire mix, while compression helps control the dynamic range of each track.
A proper application of these techniques can lead to a clear, cohesive, and professional-sounding final product.
Using Eq To Shape Your Sounds
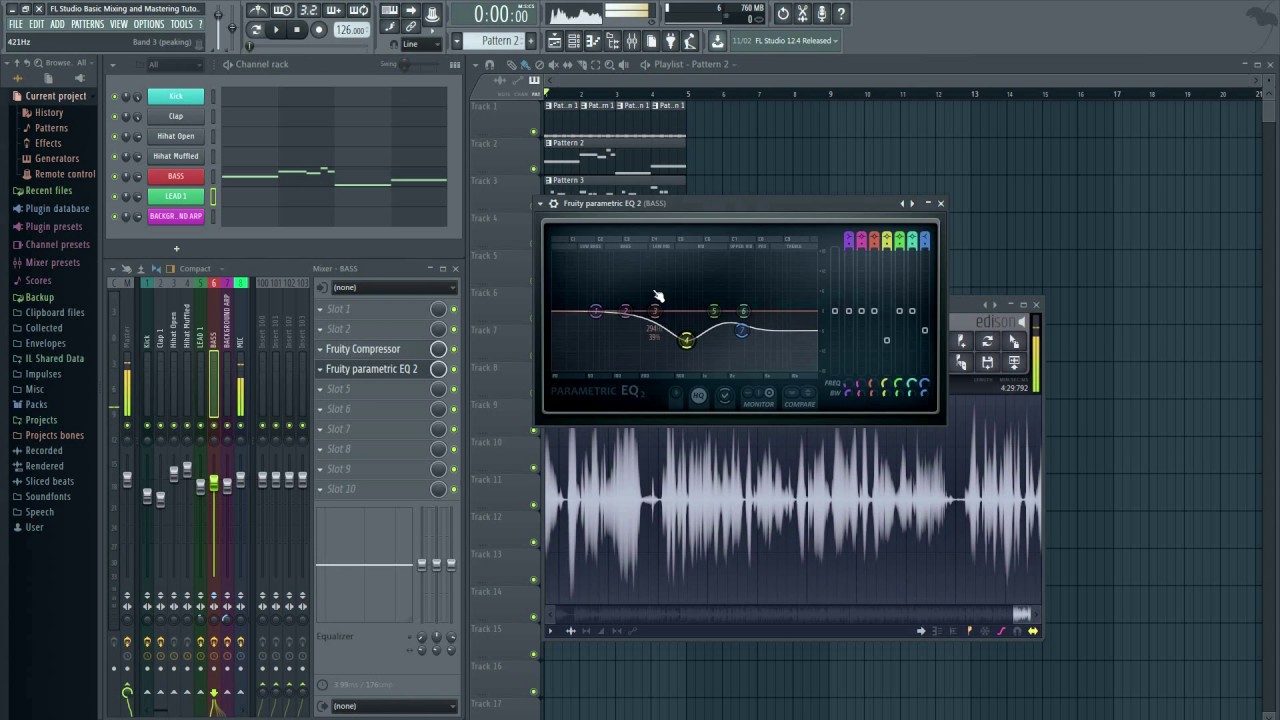
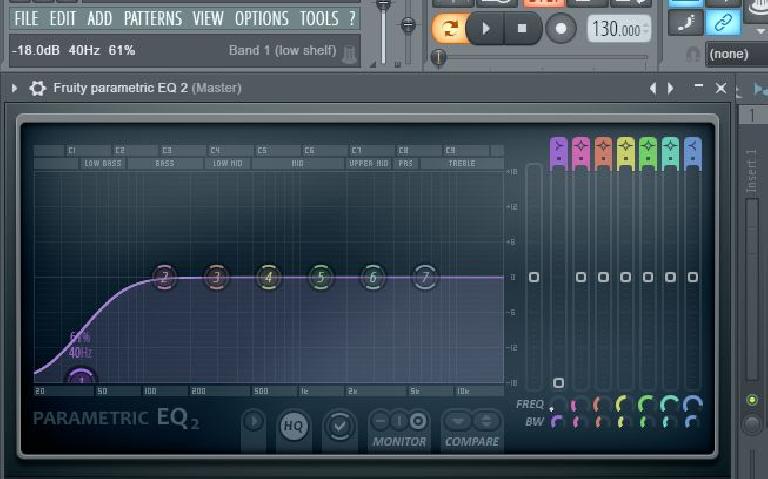
Equalization (EQ) is a powerful tool for shaping audio by boosting or cutting specific frequency ranges. If you want to bring out the brightness in a vocal recording, for example, you can use EQ to boost the higher frequencies. Conversely, if you want to make a drum loop sound more bass-heavy, you can boost the low frequencies. In FL Studio, there are several ways to apply EQ, including through the mixer channels and the Parametric EQ 2 plugin. When using EQ, it’s important to listen carefully and adjust the frequencies slowly to avoid harsh or muddy sounds.
Using Compression To Control Dynamics And Balance Levels
Compression is another fundamental tool in mixing and mastering. It works by reducing the dynamic range of an audio signal, which means that the loudest parts are reduced in volume while the quieter parts are brought up. This can help to balance out the overall levels of a track and make it sound more cohesive. In FL Studio, you can apply compression through the mixer channels or the Fruity Limiter plugin, among other options. When using compression, it’s important to set appropriate attack and release times to avoid making the audio sound too squashed or unnatural.
Other Tips For Mixing And Mastering In Fl Studio
In addition to using EQ and compression, there are several other techniques you can use when mixing and mastering in FL Studio. Some of these include:
- Using reverb and delay effects to add depth and space to sounds
- Applying automation to create dynamic changes throughout a track
- Using saturation or distortion plugins to add warmth and character to sounds
- Using panning and stereo imaging to create width in the soundstage
By experimenting with these techniques and learning to use the tools in FL Studio effectively, you can create professional-sounding mixes and masters that stand out.
Automation
Automation can greatly improve the mixing and mastering process in FL Studio. By utilizing tools such as macros, plugins, and presets, you can streamline your workflow and achieve professional-sounding results.
Automating Volume
Automating the volume is an essential technique to add dynamics to your mix. With FL Studio, automating the volume is a breeze. Simply right-click on the volume knob of the track you want to automate, and choose “Create automation clip”. A new automation clip will appear on your playlist, and you can now draw your volume automation by clicking and dragging on the clip. Tip: Don’t be afraid to experiment with different shapes and patterns for your volume automation. Smooth and gradual changes are great for creating a sense of depth, but sudden spikes and drops can add excitement and energy to your mix.
Automating Panning
Panning automation is another technique that can add life to your mix. With FL Studio, you can automate the panning of your tracks using the same method as volume automation. Simply right-click on the pan knob and create an automation clip. Tip: Experiment with automating the pan knob on individual sounds and instruments in your mix. You can create interesting stereo imaging effects by alternating the panning of sounds back and forth.
Automating Effects For A Dynamic Mix
Automating effects like reverb, delay, and filters can add a sense of movement and dynamics to your mix. With FL Studio, automating effects is easy. Simply create an automation clip for the effect parameter you want to automate, and draw your automation by clicking and dragging on the clip. Tip: Try automating effects on specific parts of your mix, like adding a touch of reverb to a snare hit or filtering out the high frequencies of a vocal to create a sense of intimacy.
Tips For Creative Automation In Fl Studio
– Start simple: Don’t feel like you need to automate everything in your mix. Start with a few key elements and build from there. – Experiment with different shapes and patterns for your automation. Smooth and gradual changes can create a sense of depth, while abrupt changes can add excitement and energy. – Don’t forget about MIDI automation: Many plugins and virtual instruments allow you to automate their parameters using MIDI. Experiment with using MIDI controllers to automate your mix. – Use automation to create tension and release: Automating the volume, panning, and effects of your mix can create tension and release that keeps your listeners engaged. In conclusion, automation is an essential technique for creating a dynamic and engaging mix in FL Studio. Whether you’re automating the volume, panning, or effects, experimenting with different shapes and patterns can take your mix to the next level. Remember to start simple and build from there, and don’t be afraid to get creative with your automation.
Credit: www.macprovideo.com
Exporting Your Mix And Master
Exporting your mix and master is the final step in creating a professional-quality track in FL Studio. After completing your mixdown and mastering, you can export your finished product to share with the world on various platforms.
Preparing Your Song For Export
Before exporting your mix and master, it’s important to make sure that your song is ready for the final stage of the production process. Firstly, ensure that all the tracks in your project are well-balanced and sound good together. Use EQ to adjust the levels of the individual tracks and panning to ensure that each sound sits nicely in the stereo field. Also, ensure that all the tracks are free from noise, clicks, and pops, which can be distracting to the listener.
Choosing The Right File Formats And Settings For Exporting
Exporting your mix and master in the right file format is crucial to ensure that your music sounds great on any platform. Firstly, choose the right file type – WAV or MP3, based on your needs. Exporting as a WAV file will ensure higher quality audio, while an MP3 file is smaller in size and better for streaming. In terms of settings, ensure that you export your song at the correct bit depth and sample rate. The bit depth and sample rate determine the quality of your audio. A bit depth of 16-bit is sufficient for MP3 encoding while 24-bit is ideal for WAV files. The sample rate should be 44.1kHz, which is the standard for CD quality audio. Once you’ve prepared your song and chosen the right file formats and settings for exporting, it’s time to actually export your mix and master. In FL Studio, simply go to the file menu and select ‘Export’. In the export window, choose your file type and settings as discussed earlier. Also, ensure that you name your file appropriately. Finally, hit the export button to render your audio file. Take a listen to the exported file and ensure that it sounds exactly as you intended. Once you’re satisfied with your export, you’re ready to distribute your music to the world!
Frequently Asked Questions On How To Mix And Master In Fl Studio
Can I Mix And Master With Fl Studio?
Yes, you can mix and master with FL Studio. It’s a popular and powerful digital audio workstation that offers advanced tools for mixing and mastering audio. You can use its various plugins, effects, and features to create professional-quality mixes and masters.
FL Studio is a great choice for both beginners and professionals in the music industry.
Is It Hard To Master Fl Studio?
No, it is not hard to master FL Studio. With its intuitive interface and wide range of tutorials and resources available online, users can quickly learn the basics and continually improve their skills over time. Many professional musicians and producers use FL Studio to create their music, demonstrating its flexibility and capability as a music production tool.
Can You Mix Professionally On Fl Studio?
Yes, you can mix professionally on FL Studio. It is an advanced digital audio workstation that provides a wide range of tools and features for mixing and mastering music. With its intuitive interface and powerful processing capabilities, FL Studio is an ideal choice for both beginners and professional musicians.
How Do I Mix And Master My Song?
To mix and master your song, follow these guidelines: adjust levels and pan settings for each track, apply EQ and compression to individual tracks and the overall mix, add reverb and delay for depth and ambiance, use automation to fine-tune the mix, and export the final mix for mastering.
Conclusion
Mixing and mastering in Fl Studio involves a combination of technical skills, creativity, and patience. With the right tools and understanding of the process, you can create professional-quality audio that is sonically balanced and optimized for any playback system. Remember to take breaks when you feel fatigued and trust your ears over your eyes.
Keep practicing and experimenting to find the right balance of technique and artistry for your unique sound. Happy mixing and mastering!