To make piano music in FL Studio, open the software and create a new project, then add a piano instrument and start programming the notes using the piano roll editor. FL Studio is a popular digital audio workstation used by music producers and composers.
FL Studio is a versatile tool that allows you to create high-quality piano music. However, it can be overwhelming and confusing for beginners. Therefore, it is important to know some basics before you dive into making piano music in FL Studio.
We will guide you on how to make piano music in FL Studio in simple and easy-to-follow steps. We will cover everything from setting up your project to programming the notes using the piano roll editor. By the end of this article, you will be able to create your own beautiful piano music in FL Studio.
Setting Up The Basics
Start creating your piano music in FL Studio by setting up the basics. Choose a tempo, select your preferred instruments and set up your project file with the correct channel settings to start composing your masterpiece.
Installing Fl Studio And Setting Up A New Project
Before diving into creating piano music using FL Studio, you need to have the software installed on your computer. Simply head over to the FL Studio website and download the latest version available. Once you have installed the software, launch it and start setting up your project. First, you need to create a new project. To do this, click on FileNew from the dropdown menu. Alternatively, you can use the hotkey combination, which is CtrlN. This will open up a new project window. In the new project window, you will see several options to customize your project. You can select the desired tempo, time signature, and other settings based on your preference. Once you are done, click on the Accept button to set up your new project.
Connecting A Midi Keyboard To Your Computer
To create piano music in FL Studio, you need to connect a MIDI keyboard to your computer. If you do not have a MIDI keyboard, you can also use your computer keyboard as a controller. However, for better results, it’s recommended that you use a MIDI keyboard. Start by connecting one end of the MIDI cable to the MIDI out port on your keyboard and the other end to the MIDI in port on your computer. Once connected, launch FL Studio and click on Options from the menu bar. Select MIDI settings from the dropdown menu. In the MIDI settings window, you will see a list of devices. Find your MIDI keyboard and select it to enable it as a MIDI input device. You can also customize other settings based on your preference. Once you are done, click on the Close button to save your settings. With your MIDI keyboard connected and set up, you are now ready to create beautiful piano music using FL Studio.
Understanding The Interface
An understanding of the interface is essential for making piano music in Fl Studio. Familiarize yourself with the different tools and functions to create beautiful melodies and harmonies with ease.
When it comes to creating piano music in FL Studio, understanding the interface is the first step towards making progress. The interface is the control center of FL Studio that allows you to access all the features necessary to create amazing music.
Navigating The Channel Rack And Piano Roll
The Channel Rack and Piano Roll are two essential components of FL Studio. The Channel Rack consists of all the instruments, sounds, and samples that you can use in your project. On the other hand, the Piano Roll is where you create and edit your melody. To navigate around the Channel Rack or Piano Roll, you can use the arrow keys or the scroll wheel of your mouse.
Getting Familiar With The Mixer And Playlist
The Mixer and Playlist are two other essential components of FL Studio. The Mixer is where you apply effects, adjust volume levels, and create tracks. The Playlist is where you arrange your patterns, create song structure, and add automation clips. To get familiar with the Mixer and Playlist, simply click and drag your mouse to create new tracks and patterns.
Using The Browser To Find Sounds And Plugins
The Browser is another feature that you will use often when creating piano music in FL Studio. It allows you to browse through samples, presets, plugins, and other resources that you may need for your project. To use the Browser, simply click on the icon on your toolbar or press the F8 key on your keyboard. From there, you can search for specific sounds, instruments, or plugins that you want to use in your project. Overall, FL Studio provides a user-friendly interface that makes it easy for beginners and experts alike to create music. By understanding the interface and getting familiar with the essential components, you will be well on your way to creating amazing piano music in no time.
Creating A Melody
Learn how to make piano music in FL Studio by creating a melody. Start by selecting notes that work well together, build on them to create a chord progression, and use various tools within the software to refine the sound.
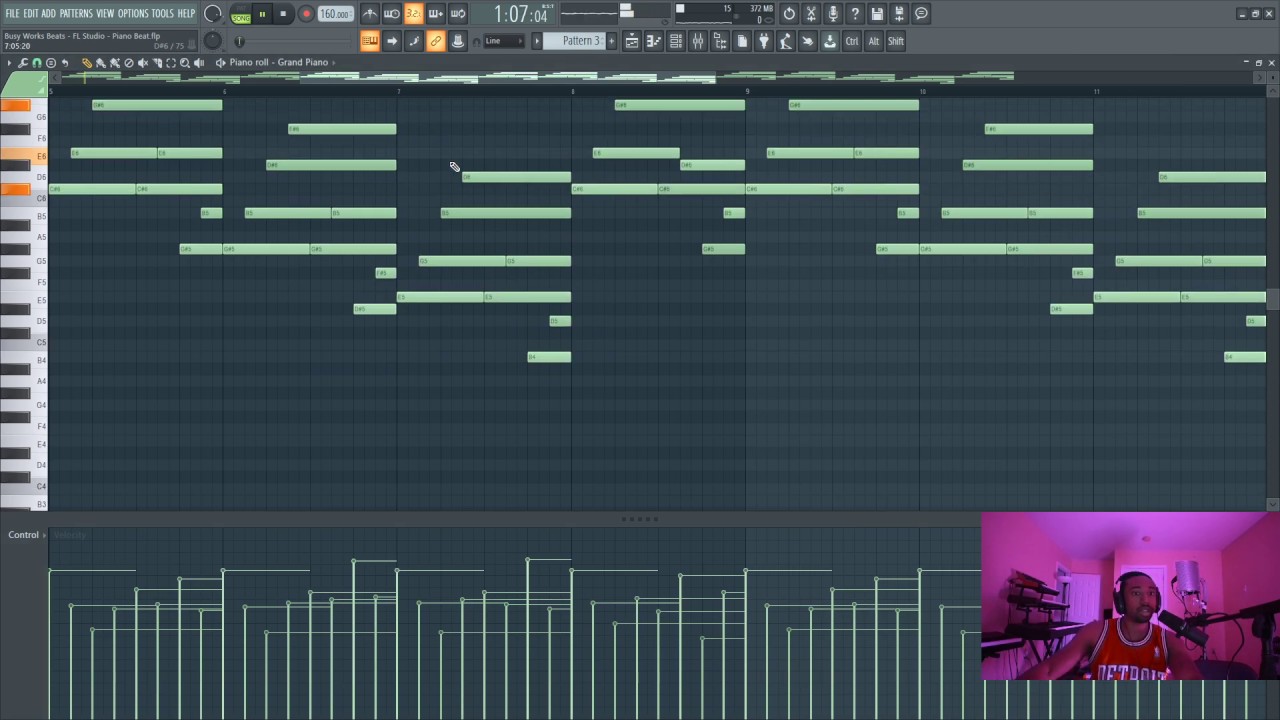
Creating a Melody Creating a melody is essential in making piano music in FL Studio. It is no doubt the backbone of any music piece, regardless of the genre. With that in mind, this section will cover the crucial steps to creating a melody that sounds great and keeps your listeners hooked. Choosing the Right Instrument Before starting, choose a piano instrument that you like and suits the song’s feel and genre. FL Studio offers several piano instruments, such as the FL Keys, Grand Piano, and others. They differ in settings, volume, and tonality, which you can customize depending on what you want. Writing Notes in the Piano Roll With your piano instrument of choice ready in the Channel Rack, go to the Step Sequencer and create a pattern. Once done, go to the Piano Roll to write notes. Make sure you have the right piano sound selected, as mentioned before, and choose the right note duration. Generally, shorter notes sound more upbeat and faster, while longer notes sound more relaxed and slower. Using the Paintbrush and Stamp Tools The Paintbrush and Stamp Tools are some of the most used Piano Roll tools in FL Studio. The Paintbrush tool is the default tool for adding and drawing notes to your melody. Conversely, the Stamp tool copies and pastes notes from other regions or patterns. With these tools, you can create unique melodies that fit the song’s style and direction. Adding Variation and Dynamics to Your Melody A monotonous melody can be boring and uninteresting to the listener. To make your melody stand out, add some variation and dynamics. Variation can be achieved by shifting notes an octave higher or lower, using different rhythms or patterns, and changing the note’s velocity. Adding dynamics means adjusting the notes’ volume, accentuating some notes more than others to create an emotional effect. In Conclusion Creating a melody is an exciting and creative process that requires patience and experimentation. Making music is more of an art than science, so don’t be afraid to try out new ideas and sounds. Remember, the most important thing is to keep your listener engaged and create emotions through your melody. With these few tips on hand, you are one step closer to making beautiful piano music in FL Studio.
Credit: www.image-line.com
Building Chords And Harmonies
Creating unique and captivating harmonies and chords is essential for making beautiful piano music in Fl Studio. Experiment with different notes and progressions to develop your own style and sound that will keep your audience engaged and captivated.
Building chords and harmonies is the foundation of making beautiful piano music in Fl Studio. Understanding basic music theory is crucial for creating chords that complement each other and bring depth to your melody. In this article, we will dive into the process of building chords and harmonies step by step. Let’s get started! ### Understanding basic music theory Before we start creating chords in the Piano Roll, let’s understand some basic music theory. Chords are made of three or more notes played together, which create harmony. The basic chords in music are the major and minor triads. The major triad consists of the first, third, and fifth notes of the major scale, while the minor triad consists of the first, third, and fifth notes of the minor scale. Knowing these chord types will be helpful when constructing chords in Fl Studio. ### Creating chords in the Piano Roll Now that we have an understanding of basic theory let’s create some chords. To create chords in the Piano Roll, place your first note in the grid and drag it across to the desired length. Next, add the third note of your chosen triad by placing it two steps higher, and then add the fifth note two steps higher than the third. This creates a complete triad. You can also shift the notes up or down octaves to create more complex chords. ### Using the Chord Stamp tool If you want to save time creating your chords, the Chord Stamp tool in Fl Studio can be used to create complex chords in one click. To use it, select the Chord Stamp tool and choose your chord type. Then, click on the grid where you want the chord to appear, and it will be added instantly, saving you time and effort. ### Adding tension and release with harmonies Once you have your chords, it’s time to add some depth to your composition by using harmonies. Harmonies are additional notes that complement your chords. Adding tension and release with harmonies can make your music more dynamic and interesting. For instance, if your chord progression is C – Am – F – G, adding a minor seventh to the Am chord creates tension that is subsequently released when the song progresses to F. In conclusion, building chords and harmonies is the foundation of creating beautiful piano music in Fl Studio. Understanding basic music theory is crucial to this process. Creating chords in the Piano Roll is easy once you have a grasp of basic theory, and the Chord Stamp tool can help you create complex chords in seconds. Adding tension and release with harmonies creates a more dynamic and interesting sound. Keep these tips in mind when creating your next piano composition!
Working With Drums And Percussion
Drums and percussion are key elements in producing a great piano track in FL Studio. They add rhythm, complexity and texture to the music. If you’re looking to create a dynamic and engaging piano track, it’s important to pay attention to the drums and percussion used in your composition. In this section, we will discuss how to choose the right drum samples, program a drum pattern in the Piano Roll, and use the Step Sequencer to add swing and groove to your drums.
Choosing The Right Drum Samples
When selecting drum samples for your composition, it’s essential to consider the style and genre of music you’re creating. Are you making a classical piano piece, or are you going for a more modern, electronic vibe? Ensure you choose the right drum kit that complements the piano sound, tempo and melody of your track.
| Classical Piano: | Electronic Music: |
| Bowed cymbals, Orchestra snare, Woodblock | 808 kick, Claps, Hi-hats, Snares |
| Percussion Ensemble, Timpani, Triangle | Trap drums, Dubstep drums, House drums |
Programming A Drum Pattern In The Piano Roll
After choosing the appropriate drum kit, select the Piano Roll and start programming your drum pattern. The Piano Roll is a graphical representation of the MIDI notes in your composition. It is a powerful tool that allows you to edit and manipulate your music’s rhythm. Here are some simple steps to follow when programming your drum pattern:
- Click on the Piano Roll icon from the toolbar
- Select the drum sampler channel from the Channel Rack
- Click on the pattern grid to create your drum pattern
- Adjust the velocity of each note to create a dynamic groove
Using The Step Sequencer
The Step Sequencer is another tool in FL Studio that helps to create drum patterns quickly and efficiently. It’s ideal for creating drum patterns with repetitive beats, such as trap or hip-hop. Here’s how to use the Step Sequencer:
- Select the Step Sequencer icon from the toolbar.
- Select the drum sampler channel from the Channel Rack.
- Click on the pads in the Step Sequencer to create your drum pattern.
- Adjust the velocity and duration of each pad to create a dynamic and rhythmic pattern.
Adding Swing And Groove To Your Drums
Swing and groove are essential elements in any music production. Adding swing to your drums can make your composition sound more natural and human-like, whereas adding groove can give it a more mechanical, robotic feel. Here’s how to add swing and groove to your drum tracks:
- Open the Piano Roll of your drum track
- Click on the Snap option and select “Step”
- Select the notes you want to add swing or groove to
- Right-click and select “Humanize” or “Quantize” to add swing or groove respectively.
To sum up, the drums and percussion in your composition play a fundamental role in creating a compelling and engaging piano track. Make sure you choose the right drum samples, program your pattern, and add swing and groove using the Piano Roll and Step Sequencer. Experiment with different combinations until you achieve the desired sound and rhythm that complements your piano track.
Mixing And Mastering Your Track
Learn the process of creating piano music in FL Studio and how to mix and master your track to achieve a professional sound quality. With the right techniques and tools, you can produce music that stands out and captures the emotions of your audience.
Mixing and mastering your track is the final step in creating a professional-sounding piano music production in FL Studio. When it comes to mixing, you will balance the levels of each instrument in the mixer to ensure that they work together in the most effective way possible. Additionally, you can use EQ, compression, reverb, and delay to help improve the overall quality of the mix and make each instrument sound unique. After mixing is complete, you’ll move on to the mastering stage, where you adjust the overall levels and apply equalization, compression, and limiters to the final mix.
Balancing Levels In The Mixer
Balancing levels in the mixer is an essential part of piano music production in FL Studio. To balance levels, you’ll need to use the slider in the mixer to adjust the volume for each instrument. Every instrument should sound clear and present, and the mixing process will ensure they sound good together in the final production. If the drums are too loud, try lowering their volume. If the piano is too quiet, boost its volume slightly. You need to balance levels so that no single instrument overpowers the track.
Applying Eq And Compression
Using EQ and compression in FL Studio can help you create a professional-sounding final mix. EQ could be used to adjust the balance of different frequencies, while compression helps maintain a consistent level of volume. You can use these effects to give each instrument its place in the mix. A technique called “side-chaining” can be useful for genres like EDM or Techno. This technique uses an instrument to “duck” when another instrument is playing.
Using Effects Like Reverb And Delay
Effects like reverb and delay give piano music a sense of space and atmosphere. Reverb creates a sense of space, while delay creates the impression of echoes. You can use these effects to create depth within the mix and make each instrument sound unique. Don’t overdo it, or the effects may become too intrusive, and the mix will sound muddy.
Mastering Your Track For Radio Or Streaming
Mastering your final mix involves preparing it for the different platforms where it will be played. You want to make sure that your track sounds great on a variety of devices like home music systems, headphones, smartphones, or car stereos. To achieve this, you should balance the overall volume and apply EQ, compression, and limiters to the final mix. Make sure your track has a good dynamic range and not too loud, or it might result in distortion. You want to ensure that your final mix sounds just as great on the various platforms where your track will be played. In summary, mixing and mastering your track is the final and most important stage of creating a professional-sounding piano music production in FL Studio. You should balance levels in the mixer, use EQ, compression, reverb, and delay to help improve the mix, and master your final mix for radio or streaming. Keep these tips in mind, and your piano music production will be sure to sound great!
Collaborating With Others
Collaborating with other musicians can enhance the quality of your piano music created in FL Studio. By working with others, you can brainstorm new ideas and add different musical elements to your composition. Communication and imagination are essential for a successful collaboration.
Collaborating with other musicians can be incredibly rewarding, bringing fresh perspectives and ideas to your compositions. This is especially true for piano music, which can benefit greatly from collaborating with other instrumentalists. Here are some tips for successful collaboration in Fl Studio.
Exporting Your Stems For Collaboration
Sharing your project with other musicians in Fl Studio is easy. To start, make sure you have all of your project’s components saved and backed up. Then, go to the File menu and select Export > Project Bones. This will save all of your project’s individual instrument tracks as separate files, making them easy to share. You can also choose to export your entire project as a single MIDI file, which can be opened and edited in any other DAW.
Using The Zgameeditor Visualizer For Videos
If you’re collaborating with someone on a music video, Fl Studio’s ZGameEditor Visualizer can be a great tool. This plugin allows you to create visually stunning music videos that synchronize with your music. To use it, simply add the plugin to your project and customize the visualizer settings to fit your music. You can also use the built-in video recorder to capture your visualizations for use in music videos or live performances.
Finding Other Musicians To Collaborate With
Finding other musicians to collaborate with can be a bit tricky, but there are plenty of online resources available. Try searching for local music groups on social media, or join an online music community to connect with like-minded musicians. Be sure to communicate your goals and expectations clearly, and be open to different ideas and approaches. With the right collaboration partner, you can create beautiful and unique piano music that you never would have created on your own. With these tips, you’re well on your way to successfully collaborating with other musicians in Fl Studio. Remember to communicate effectively and be open to new ideas, and you’ll be sure to create beautiful and unique piano music that you can be proud of.

Credit: www.image-line.com
Promoting Your Music
Learn how to create beautiful piano music using FL Studio, a popular digital audio workstation. From setting up your project to adjusting the tempo and learning keyboard shortcuts, this guide has everything you need to start producing your own original tracks.
Once you’ve created your stunning piano music in FL Studio, it’s time to promote it to the world. Without promotion, your music may not get the exposure it needs to be successful. Here are some tips on how you can promote your music to get it heard by a wider audience:
Uploading Your Music To Streaming Platforms
One of the easiest ways to promote your piano music is to upload it to streaming platforms like Spotify, YouTube, and Apple Music. These platforms have millions of active users who are constantly searching for new music. By uploading your music, you’ll make it available to a wider audience, and with a little bit of luck, your music may end up on the platform’s popular playlists.
Using Social Media To Get Your Music Heard
Social media is another powerful tool that you can use to promote your piano music. Platforms like Twitter, Facebook, and Instagram provide you with an opportunity to reach a larger audience. You can share your music with your followers, post updates about your upcoming performances, and participate in conversations related to your music.
Networking With Other Musicians And Fans
Networking with other musicians and fans is another great way to promote your piano music. Attend local events and connect with other musicians and fans in your area. Collaborating with other musicians can help you expose your music to new audiences, while connecting with fans can help you build a dedicated following.
Submitting Your Music To Blogs And Playlists
Finally, you can submit your piano music to various blogs and playlists. Music blogs and online radio stations are always looking for new music to feature on their websites. Submitting your music to these platforms can help you get exposure to a wider audience. Similarly, submitting your music to curated playlists on platforms like Spotify can also help you reach new listeners. In conclusion, promoting your piano music in FL Studio is all about making it available to a wider audience. By uploading your music to streaming platforms, using social media to get your music heard, networking with other musicians and fans, and submitting your music to blogs and playlists, you can increase your chances of getting your music heard by a wider audience.
Credit: m.youtube.com
Frequently Asked Questions On How To Make Piano Music In Fl Studio
How Do I Make My Fl Studio Sound Like A Piano?
To make FL Studio sound like a piano, you can use the software’s built-in piano sound or a plugin like Keyscape or Pianoteq. Adjust the velocity and timing of the notes to mimic a piano player’s touch. Use reverb and EQ to create a realistic piano sound.
Experiment with different microphone positions and techniques to enhance the sound further.
Does Fl Studio Have A Piano Plugin?
Yes, FL Studio does come with a piano plugin. It’s called “FL Keys” and it’s a sample-based plugin that offers high-quality piano sounds. You can find it in the browser under the “Plugin presets” > “Generators” > “FL Keys” folder.
How Do You Make Piano Notes In Fl Studio?
To make piano notes in FL Studio, you need to select a plugin like FL Keys or Kontakt. Then, open the piano roll, choose the length of the notes and place them on the grid. You can also adjust the timing and velocity to create more realistic piano sounds.
How Do I Record Piano Sounds In Fl Studio?
To record piano sounds in FL Studio, connect your MIDI controller to your computer and open FL Studio. Create a new project and insert a new instrument channel for the piano sound. Select a piano VST plugin and start playing your MIDI controller to record the piano sounds in FL Studio.
Conclusion
To sum it up, creating piano music in FL Studio is an exciting and fulfilling process. It requires a combination of technical skills and creativity to produce a unique melody that resonates with the audience. By following these steps and experimenting with various features, you can produce music that reflects your personal style and artistic vision.
Whether you are a seasoned musician or a beginner, FL Studio offers endless possibilities to explore and express yourself through music. So, let your imagination run wild and start making beautiful piano music today!