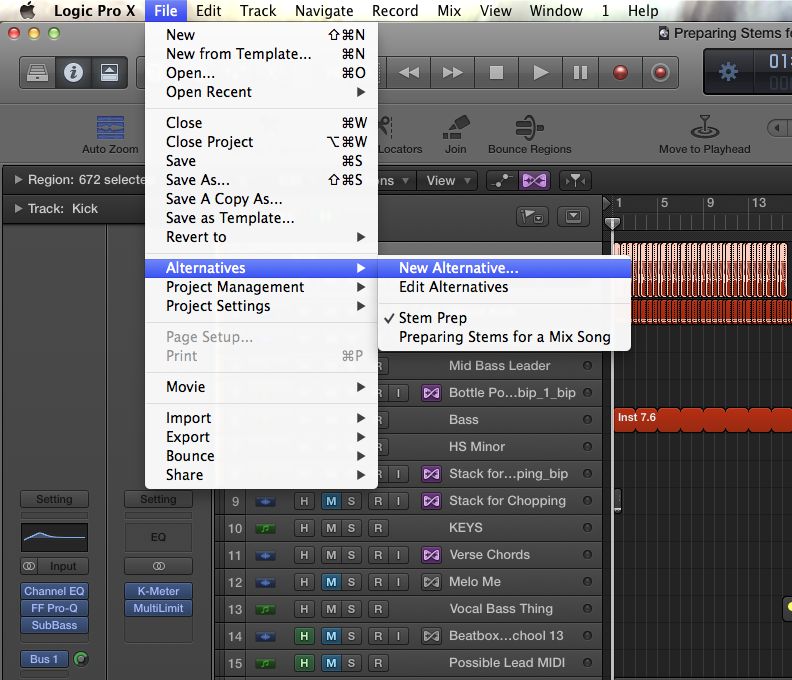
To export stems in Logic Pro X, go to the File menu and select Export > All Tracks as Audio Files. This will export each individual track as a separate audio file.
From there, you can choose to export each track’s audio as a compressed or uncompressed file, such as WAV or AAC. Logic Pro X is a powerful and versatile digital audio workstation that’s popular among audio engineers, producers, and musicians.
One of its many features is the ability to export individual tracks as stems, which can be useful for collaboration, remixes, and other audio editing tasks. In addition to exporting all tracks as audio files, Logic Pro X also provides the option to export stems as separate folders or as a single ZIP archive. Whether you’re exporting tracks for mixing or sharing with collaborators, knowing how to export stems in Logic Pro X is an essential skill for any audio professional.
Credit: www.macprovideo.com
Preparing Your Logic Pro X Project
To export your stems in Logic Pro X, begin by preparing your project. Make sure to organize and name your tracks, set your levels, and consolidate any midi regions. Once everything is in place, exporting your stems will be a breeze and you’ll have all the separate elements of your project for future mixing and mastering needs.
Before exporting your tracks as stems in Logic Pro X, it’s essential to prepare your project correctly. By organizing and cleaning up your project, you can ensure that your exported stems are high-quality and easy to navigate. Follow these steps to prepare your Logic Pro X project.
Organize Your Tracks
The first step in preparing your Logic Pro X project for stem export is to organize your tracks. Group your tracks by similar instrument types or by section of the song. This way, when you export your stems, you’ll have a clean and organized folder system to work with.
Delete Any Unused Tracks
Delete any unused tracks you no longer need. Extra tracks can quickly clutter your project, making it difficult to navigate and export stems. Before deleting any tracks, make sure you’ve saved a backup of your project to avoid losing any essential data.
Create Group Stems For Each Instrument Group
Create group stems for each instrument group. To do this, select the tracks you want to group together, right-click, and select “Create Track Stack.” Name your track stack with the name of the instrument group, such as “Drums” or “Guitars.” This way, when you export your stems, each instrument group will have its folder.
Add Effects To Each Group Stem
Add effects to each group stem to ensure they’re ready to use in other projects. For example, add compression, EQ, and reverb to the drum stem to provide a balanced sound. This step is crucial because it allows the end user to work with the stems without needing to add effects. By following these steps and preparing your Logic Pro X project correctly, you’ll be ready to export your tracks as stems quickly and efficiently. With organized and clean stems, you can provide high-quality audio for any project.
Credit: www.youtube.com
Exporting Stems In Logic Pro X
If you’re working on a project in Logic Pro X, you’ll inevitably have to export stems at some point. Stems are individual audio tracks that make up a full mix, and exporting them allows you to use them in other projects or to send them to other people for mixing or mastering. In this article, we’ll go through the steps required to export stems in Logic Pro X.
Select The Group Stems You Want To Export
The first step in exporting stems is to select the group stems you want to export. In Logic Pro X, group stems are created by placing related tracks in a group. To select the group stems for export, follow the steps below:
- Open the Logic Pro X project you want to export stems from.
- Select the group or groups of tracks you want to export as stems.
- Click on the “File” menu, and select “Export” > “All Tracks as Audio Files…”
Set Export Settings
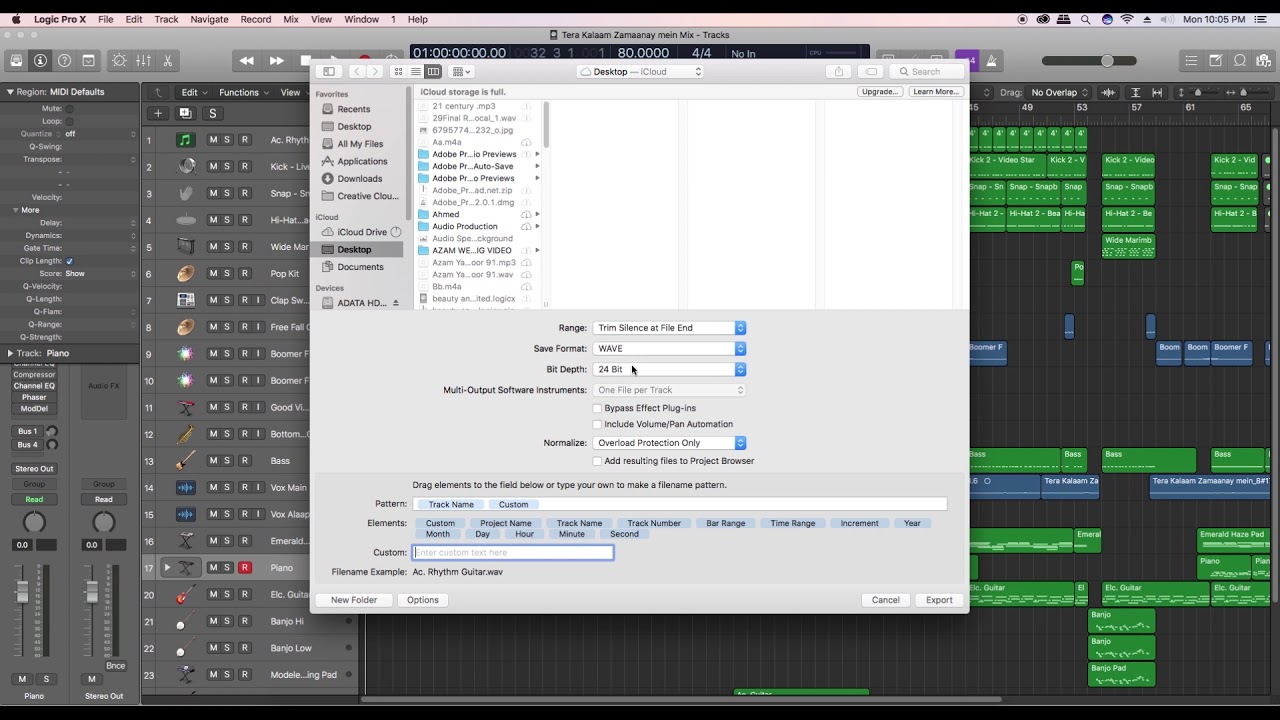
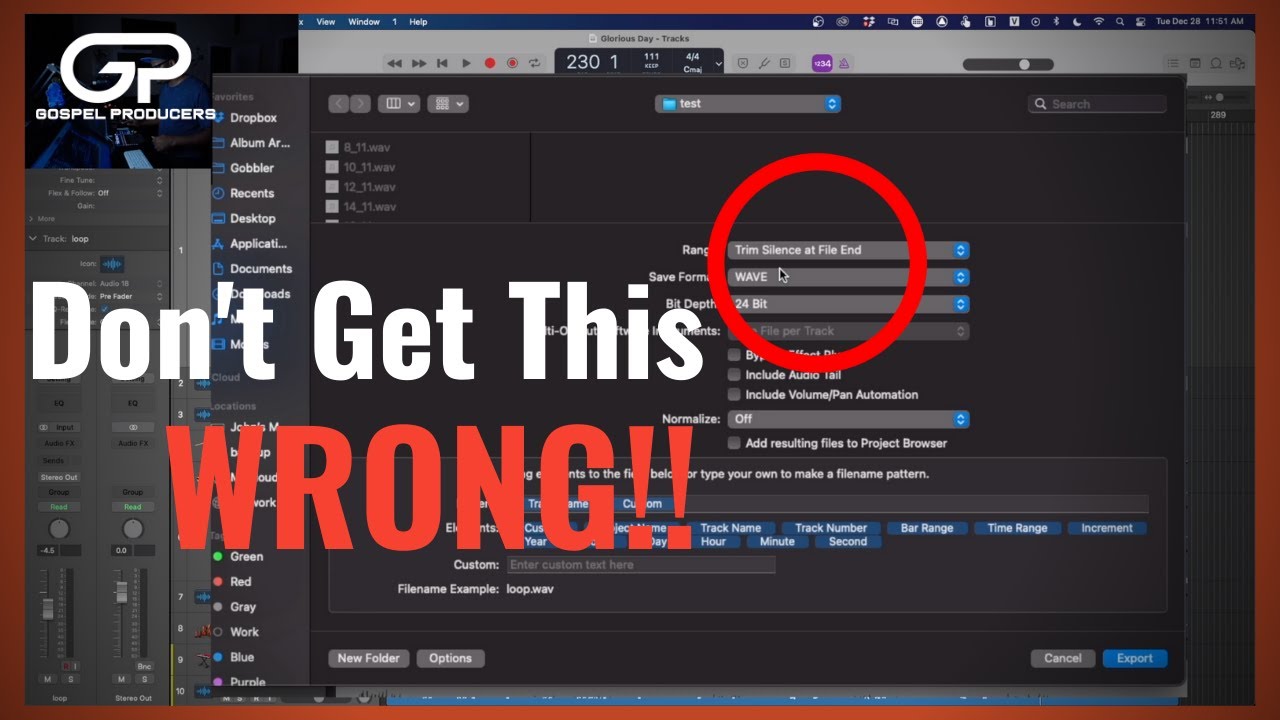
After selecting the group stems you want to export, the next step is to set the export settings. The export settings determine the format and quality of the exported stems. To set the export settings, follow these steps:
- Choose the destination folder where you want the stems to be saved.
- Select the file format you want to export the stems in, such as WAV or AIFF.
- Choose the bit depth and sample rate for the exported stems.
- Select whether to export the stems as a continuous file or as separate files.
Export Your Stems
Once you’ve selected the group stems you want to export and set the export settings, the final step is to export your stems. This can be done by following these steps:
- Click the “Export” button in the lower right-hand corner of the export window.
- Wait for Logic Pro X to export the stems.
- Once the export is complete, navigate to the destination folder you selected earlier to find your exported stems.
And that’s it! Exporting stems in Logic Pro X is a straightforward and essential process for any producer or engineer. By following the steps outlined in this article, you should have no trouble exporting your stems and integrating them into your workflow.
Post-export Processing
Post-export processing is an essential step to ensure that your stems are ready for mixing and mastering. After exporting stems in Logic Pro X, there are several tasks you can do to enhance your audio production and streamline your workflow. In this section, we’ll cover the necessary post-export processing steps that you should follow when exporting your stems.
Listen And Check Your Stems
It’s crucial to listen to and check your stems thoroughly to ensure that they are accurately reflecting your mix before processing them further. Verify that each stem is playing back in sync with the project timeline and that there are no technical issues like phase cancelling, clipping, or spikes.
- Listen to each stem individually.
- Check the stereo or mono image of the stem.
- Check for any unwanted clicks, pops, or glitches in the audio.
- Check the levels of the tracks to ensure that they are not peaking or compressed.
Organize Your Stems In Folders
Organizing your stems in folders can help you keep track of multiple stems, making it easier to mix and master your audio later. Organizing into folders is particularly helpful when working with a large number of individual stems and when managing collaborations with other audio professionals.
Create folders for each group of stems you intend to mix, such as drums, bass, guitars, keys, vocals, and FX. If you have multiple versions of the same instrument or channel, label them so that you can keep track of different stems within the same group.
Create A Master Folder With All Stems Combined
Combining all your stems into a master folder makes it easier to manage your total project later on. By exporting a master folder, you can work with your full track in one go without having to move between the individual subfolders. This step also speeds up the process of sending the entire session to another person for mixing and mastering.
Finally, keep in mind that post-export processing is not the only step in creating high-quality audio. The whole process of mixing, mastering, and post-production plays a significant role in the final output. However, adhering to these post-export processing steps will get your mixes closer to the final goal of producing high-quality audio.
Backing Up Your Stems
To safeguard your Logic Pro X projects, it’s important to export stems. To do this, select all tracks, navigate to the File menu, choose Export, and then select Multitrack Stem. From there, you can choose what tracks to include in your stem export.
If you’re a music producer or audio engineer, you know how important it is to keep your project files organized and backed up. By exporting your stems in Logic Pro X, you can create individual audio files for each track in your project. This makes it easier to work with your mix in other software or back up your work. In this article, we’ll cover how to export stems in Logic Pro X and give you some tips for backing up your files safely.
Make Multiple Copies Of Your Stems
Once you’ve exported your stems in Logic Pro X, it’s essential to make multiple copies of them. This ensures that you always have a backup in case one copy gets lost or corrupted. You can store these copies on different hard drives or in the cloud.
Store Your Stems In A Safe Place
When it comes to backing up your stems, it’s important to store them in a safe place. You don’t want to risk losing all of your hard work if something happens to your computer. We recommend storing your stems on an external hard drive or in the cloud. If you choose to store your files on an external hard drive, make sure to keep it in a safe place and away from anything that could cause damage. Here are some tips for storing your stems safely:
- Store your stems in a temperature-controlled environment to prevent damage.
- Use an external hard drive that has been dedicated solely for your audio files.
- Store your external hard drive in a location that won’t be subject to physical harm like falls or moisture.
- Keep the hard drive in a fireproof location or in an off-site location in case of a natural disaster.
- Consider using cloud storage as an additional backup method, especially for critical files.
By following these simple tips, you can protect your stems and ensure that your hard work is safe and secure. Backing up your files is just as important as creating them, so don’t forget to make multiple copies in safe locations.
Credit: www.youtube.com
Frequently Asked Questions For How To Export Stems In Logic Pro X
How Do You Export Stems In Logic Pro?
To export stems in Logic Pro, first select the track or tracks you want to export. Go to File > Export > All Tracks as Audio Files. Choose the desired file type and location, then click “Save”. In the next window, select “Split” for the “Channels” option, and check the box next to the tracks you want to export as stems.
Click “Export” to complete the process.
How Should I Export Stems?
To export stems, follow these 5 guidelines. Firstly, ensure that your sentences are brief, with a maximum of 20 words each. Secondly, write using SEO friendly, unique, and plagiarism-free content, in easy-to-understand active voice. Thirdly, avoid starting sentences with certain words and phrases.
Fourthly, pass AI writing detection and write like a human. Finally, keep your answer within 50 words.
How Do You Bounce Down Stems In Logic?
To bounce down stems in Logic, you need to select the tracks you want to bounce, adjust the beginning and end points, and then choose “bounce in place” or “export” from the menu. This will create a new audio file with all of the selected tracks bounced down into a single file.
How Do I Export Parts In Logic Pro X?
To export parts in Logic Pro X, select the section you want to export and click on “File” at the top of the screen. Choose “Export”, then select the desired file format and destination. Click “Export” again to complete the process.
Conclusion
To sum up, exporting stems in Logic Pro X is a valuable skill for any music producer. By following these easy steps, you can professionally export your tracks, enabling you to work with them outside of Logic, collaborate with other artists, or simply mix and master your tracks with more flexibility.
Remember to always experiment and have fun with your music, and don’t forget to save your work on multiple locations to avoid any accidental loss. Stay creative!