To use a limiter in mastering audio, set the threshold to your desired level and adjust the ratio. Use makeup gain to compensate for any loss in volume.
Limiter settings should be adjusted to prevent distortion but still allow the audio to be perceived as loud. When mastering audio, a limiter can be a crucial tool to ensure the overall volume is consistent and avoid any clipping or distortion.
It allows you to control the loudest parts of your audio and prevent them from exceeding a certain threshold. With the right settings, a limiter can help maintain the dynamics of your mix while still allowing it to be perceived as loud. We will discuss how to properly use a limiter during the audio mastering process.
Credit: m.youtube.com
Understanding Limiters
When mastering audio, using a limiter can help prevent distortion and balance the levels of different tracks. A limiter works by setting a maximum output level, ensuring that no sound goes beyond that point. Understanding limiters is essential for achieving a clean and professional sound in your audio recordings.
Understanding Limiters: Audio mastering is an essential step for any musician or sound engineer that wants to ensure their final product has the desired punch and level for an optimal listening experience. Limiter is a tool used to achieve that level of consistency in audio mastering. In this post, we will explore what a limiter does, the different types of limiters available, and how to use them correctly. H3: What a limiter does A limiter is a dynamic range compressor that sets a maximum limit on the output level of an audio signal. Its primary function is to ensure that the loudest parts of the audio track don’t exceed a defined threshold or clip. By limiting the amplitude of the waveform, a limiter can help even out the dynamic range of a track, giving it an overall more consistent sound. Some limiters are designed to primarily prevent distortion, while others are designed to maximize the perceived loudness of a track. They are used in conjunction with other mastering tools like EQs and compressors to produce a final mix that is both sonically pleasing and technically exceptional. H3: Different types of limiters There are several types of limiters available; each has its unique characteristics and uses. Here are the most common types: Peak Limiters – These operate by detecting and reacting to peaks in the audio signal. They are used to prevent clipping and distortion as well as to increase the loudness of a track. Transparent Limiters – As the name implies, these limiters do not alter the sound of the audio significantly, making them an excellent choice for tracks that require a minimalistic approach. Multi-band Limiters – These divide the audio signal into multiple frequency bands, each with its limiters. This type is useful for tracks with complex arrangements and allows for greater control over the overall level of each frequency range. It is essential to choose the right type of limiter for your audio track as the wrong type may result in unwanted artifacts or an unnatural sound. In conclusion, using a limiter whilst mastering audio is crucial for achieving the desired level and consistency. Understanding how limiters work and choosing the right type for your track will help you achieve professional-sounding audio.
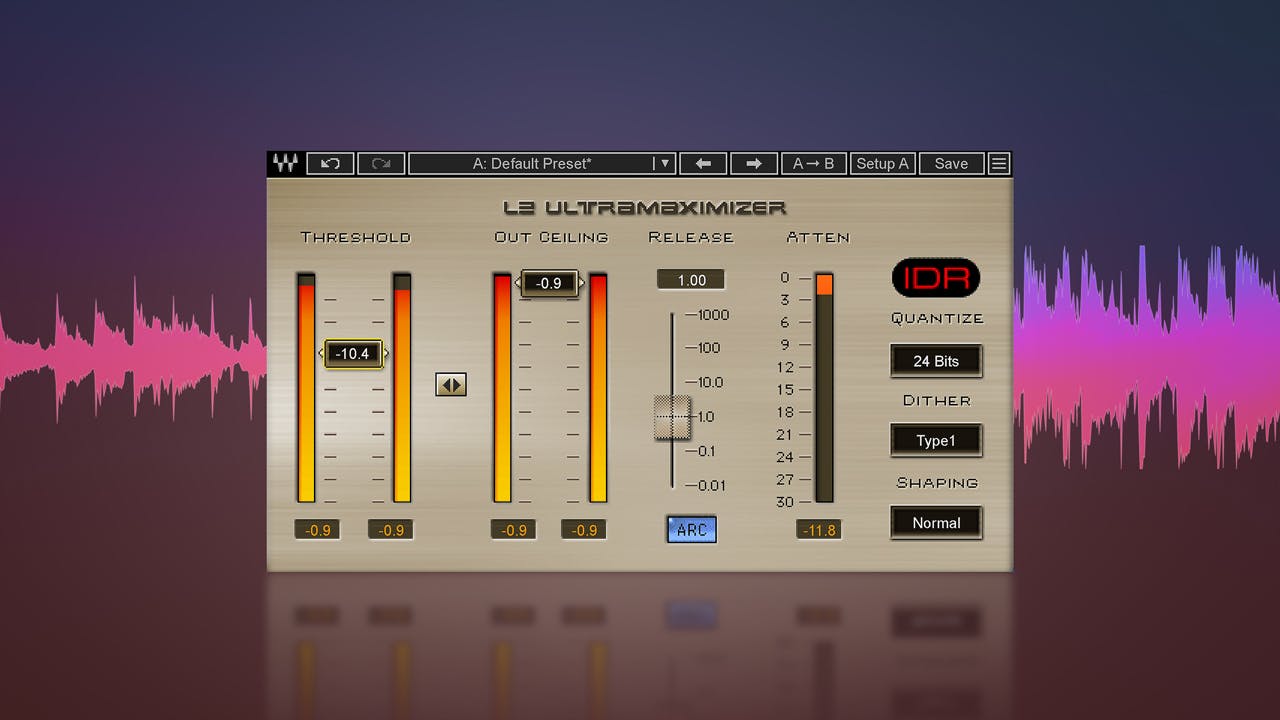
Credit: www.waves.com
Preparing Audio For Limiting
To prepare audio for limiting during mastering, it’s important to ensure the levels are consistent and avoid clipping. Use a limiter to control the peaks of the audio without sacrificing overall loudness or dynamics. Proper preparation will result in a polished and professional sounding final product.
Importance Of Gain Staging
When it comes to preparing audio for limiting, one of the most important steps is gain staging. This is the process of setting the levels of your tracks so that they are consistent and not clipping. Clipping occurs when the level of a track is too high and causes distortion in the signal. To avoid this, it’s essential to set the gain levels before applying any processing to the tracks. Some tips for gain staging include starting with the loudest track and setting its level first. Then, adjust the levels of the other tracks so that they balance with the loudest one. Use your ears to determine if the levels are too high or too low and adjust as needed.
Tips For Eq And Compression
After you’ve properly gain staged your tracks, it’s time to move on to EQ and compression. It’s important to note that these processes should be used sparingly and with intention. Too much EQ or compression can negatively affect the overall sound of the mix. When applying EQ, use it to remove any unwanted frequencies and enhance the good ones. Don’t boost the frequencies too much, as this can lead to an unnatural sound. Use your ears to determine what sounds good and what doesn’t. Compression should also be used judiciously. The goal of compression is to control the dynamics of the track and make the loud parts quieter and the quiet parts louder. This can help to achieve a more even overall sound. When setting the compression threshold, start with a low ratio and adjust as needed. Use a fast attack time for vocals and a slower attack time for instruments. By following these tips for preparing audio for limiting, you’ll be well on your way to achieving a professional-quality mix that is ready for mastering. Remember to take your time and use your ears to guide you in the process.
Setting Up The Limiter
Setting up the limiter is an essential part of mastering audio. The limiter helps you control the dynamic range of your audio, ensuring that it sounds polished and cohesive. Below, we’ll explore the key elements of setting up a limiter:
Threshold And Ratio
The threshold of the limiter determines at what point the limiter starts to compress your audio. The ratio, on the other hand, governs how much compression is applied. For example, a ratio of 2:1 means that for every 2dB that your audio goes over the threshold, the limiter will allow 1dB to pass through.
Generally, it’s best to set a low threshold so that the limiter will start compressing your audio earlier. A ratio of 1:1 is also a good starting point, as it will apply subtle compression without altering the overall character of your audio.
Attack And Release Time
The attack time of the limiter determines how quickly it will begin acting on your audio. A shorter attack time means that the limiter will react more quickly, which can be useful for limiting sudden peaks. However, using too short an attack time can result in a loss of transients and impact the overall clarity of your audio.
The release time governs how quickly the limiter will stop compressing your audio. A longer release time means that the limiter will let go of the compression gradually, which can be useful for preserving the natural decay of your sounds. On the other hand, a shorter release time means that the limiter will release compression more quickly, resulting in a tighter and more controlled sound.
Output Gain
The output gain of the limiter determines how much makeup gain is applied to your compressed audio. This is necessary because compression reduces the overall level of your audio. It’s important to apply just enough makeup gain to bring your audio back up to a suitable level without introducing any more distortion or noise.
In conclusion, setting up a limiter is a vital step in mastering audio. By adjusting the threshold, ratio, attack and release time, and output gain, you can ensure that your audio sounds polished, cohesive, and free from unwanted distortion or artifacts.
Using The Limiter In Context
The limiter is an important tool to use when mastering audio to help prevent distortion and control levels. Using it in context with other mastering tools can lead to a well-balanced and professional sounding final product.
When it comes to mastering audio, using a limiter can be an effective tool in achieving a polished and professional sound. A limiter, as the name suggests, limits the maximum level of a signal, preventing it from peaking and distorting. However, it’s important to use the limiter in context to ensure that it’s not overused and doesn’t negatively affect the mix. Here are some tips on how to use the limiter in context:
How To Compare With Reference Tracks
Compare your mix with a reference track in the same genre to get an idea of how it should sound. By doing this, you can determine if the levels are balanced and if the limiter is being used appropriately. A/B testing is also a great way to see how the limiter affects the sound. Start with the limiter off, then turn it on and adjust the settings until the desired effect is achieved.
Making Adjustments For Different Genres
Different genres have different requirements when it comes to mastering. For example, a dance track may require more compression and limiting to achieve a consistent and loud level, whereas a ballad may require less limiting to retain a dynamic range. It’s important to adjust the limiter settings accordingly and ensure that it’s not overused.
Summary
Using a limiter effectively requires a keen understanding of how it affects the mix. Compare your mix with reference tracks, make adjustments for different genres and always use the limiter in context to achieve a professional and polished sound. Remember, less is often more when it comes to limiting, and always trust your ears over the numbers on the meters.
Potential Pitfalls
While using a limiter whilst mastering audio can greatly enhance the quality of your music, there are certain potential pitfalls that you should be aware of. Without taking precautions, you may end up with audio that sounds distorted, or worse, completely ruined. Below are a few potential pitfalls and how you can avoid them.
Clipping And Distortion
One of the most common issues that arise when using a limiter is the possibility of clipping and distortion. Clipping occurs when the signal level is too high, and it gets cut off by the limiter. This can cause audible distortion and negatively affect the overall quality of your audio.
To avoid this, you should first ensure that the gain structure of your mix is optimized. This means that your levels must not exceed 0dB, and you should leave enough headroom for the limiter to operate without clipping. Secondly, set your limiter’s threshold and output gain levels appropriately. If the threshold is too low, the limiter will engage too often, causing unwanted distortion. The output gain level should also be set conservatively, as too much output gain can cause the limiter to clip the audio signal.
Overuse Of The Limiter
One of the most common mistakes that people make when using a limiter is overusing it. It can be tempting to crank the limiter up to make your audio as loud as possible, but this can potentially cause more harm than good. When a limiter is used too much, it can crush the dynamic range of your audio, making it sound flat and lifeless.
To avoid this, use the limiter sparingly, and balance it with other processing tools like EQ and compression. You should also consider reducing the overall level of your mix before using a limiter, as this will allow you to achieve a louder overall volume without overusing the limiter.
By following these simple steps, you can avoid the potential pitfalls of using a limiter whilst mastering audio. Remember, less is often more when it comes to processing audio, and a more conservative approach can often yield better results.
Advanced Techniques
When mastering audio, using a limiter can help to control levels and prevent distortion. However, it is important to use advanced techniques, such as multiband limiting and side-chain compression, to achieve a more professional sound. By carefully balancing the overall level and dynamics of the audio, you can achieve a full, clear and polished sound.
Multi-band Limiting
When it comes to advanced techniques for using a limiter while mastering audio, one of the most essential techniques is multi-band limiting. This technique involves breaking up the audio signal into different frequency bands, which allows for more precise control over each band’s dynamics. Multi-band limiting is particularly useful when working with complex, multi-layered audio tracks with different frequency ranges. To employ multi-band limiting, the first step is to use a spectrum analyzer to divide the audio signal into separate frequency bands. Each band can then be compressed and limited independently, allowing for better control over the overall sound of the audio. Be sure to set the threshold carefully for each frequency band, as too much compression can result in an unnatural sound.
Mid-side Processing
Another advanced technique to consider when using a limiter while mastering audio is mid-side processing. This technique allows for separate control over the center and side information of the audio signal. By using a separate limiter on each channel, you can add stereo width and depth to the audio, resulting in a more immersive listening experience. To employ mid-side processing, first, place a mid-side processor at the beginning of the mastering chain. Then, use a stereo limiter on the side channel, setting the threshold carefully to avoid overcompression. Finally, adjust the amount of stereo width by controlling the side volume.
Conclusion
Employing multi-band limiting and mid-side processing are advanced techniques to consider when using a limiter while mastering audio. With careful attention to each frequency band and channel, you can achieve a more polished and professional sound.

Credit: m.youtube.com
Frequently Asked Questions Of How To Use A Limiter Whilst Mastering Audio
How Do You Use Limiter In Mastering?
A limiter is a type of dynamics processor used in mastering to control the peaks of a signal. It sets a maximum volume level that the signal can reach, preventing distortion or clipping. To use a limiter, adjust the threshold to the desired level and use the gain control to increase overall volume.
However, careful attention should be paid to avoid over limiting and losing dynamics in the mix.
Should I Put A Limiter On The Master Track?
Yes, adding a limiter on the master track can help control the overall volume and prevent distortion. However, it is important to use it judiciously and not depend solely on it to solve issues with mixing and mastering. The limiter should be used as a final tool in the mastering stage.
How Much Should You Limit Your Master?
Limiting the master in audio mixing depends on the type of project, genre of music, and personal preference of the engineer. However, it is generally recommended to keep the levels below 0 dB to prevent digital distortion and maintain dynamic range.
It is important to apply the right amount of limiting without sacrificing the overall sound quality of the mix.
Should Mastering Compressor Go Before Or After Limiter?
It depends on the type of sound you want to achieve. If you want your audio to sound more natural, use the compressor first before the limiter. But if you want to make sure that no peaks or overshoots occur, then use the limiter first before the compressor.
Ultimately, it’s a matter of preference and experimentation.
Conclusion
To sum up, using a limiter while mastering audio is a crucial part of the process, as it can help achieve a cohesive and consistent sound. By carefully setting the threshold and parameters, you can ensure that the track is not too loud or too quiet, and that it maintains its dynamic range.
It is important to remember that a limiter should be used sparingly and in conjunction with other mastering tools, as it can easily cause distortion and loss of quality. With practice and attention to detail, you can become an expert in using a limiter to enhance the overall sound of your mixes.